HOOK, LINE AND SINKER!
Words Peter Hart // Photos Simon Bassett & Hart Photography
Do you have issues with your harness, the design, the set-up and the technique? Even if you think you don’t, it could probably be better, Harty tells us how.
“Why don’t you try the harness?” Suggested Walter, the owner of the Manor farm windsurfing school on the shores of lake Thun in Switzerland’s Berner Oberland. The date was the 24th June 1980. I know this because I kept a diary. I’m not especially anal but this was my first instructing job at a time when the sport was about to go nuts. Major developments, personal and otherwise, occurred daily. It was crazy not to record them and this day was especially special.
The lake of Thun is not a windy mecca. Force 2 was a good day. However, the surrounding mountains and the heat of summer would produce the odd storm. A good one lasted an hour if you were lucky. The super-organised Swiss had ‘Sturmwarnung’ lights around the shore that started flashing when one was imminent and gave you time to prepare.
My boss Walter was well ahead of the game. As soon as the first wave jumping pictures drifted in from Hawaii he got hold of some custom ‘jump boards’ from Surfline Sylt in Germany. Laying on the glassy calm shore they looked as out of place as a rack of snow skis in the Sahara. However, no sooner had they arrived than we got smacked by three storms in three days. Lessons were cancelled and off we launched into an extraordinary period of trial and discovery.
By the third ‘storm’ (to be fair, it was probably all of 22 knots) my palms looked gorier than a Four Seasons pizza and my forearms were only slightly less knotted than a hundred year old oak tree. It was then that Walter arrived on the shore with a harness. He’d used one before for racing and so knew about the lines and how to set them up … well he knew a couple of knots at least.
I will never forget that first time I hooked in. My diary entry that night was punctuated with more exclamation marks than a teenage schoolgirl describing her first date.
“This was AMAZING!!!!! Praise to the harness!!! NO EFFORT NEEDED!!! My life has changed FOREVER!!!!”
EVERY SILVER LINING HAS A CLOUD
It seemed that this simple garment had instantly opened a door to high performance windsurfing. But actually what I was describing was the ecstasy of temporary pain relief. It wasn’t all good.
Rewind to that windy afternoon and the harness Walter handed me was in fact that of his wife. It was an early shoulder harness (it was also pink). There was no spreader bar just a single hook on a plate. As you hooked in, the plate pulled away from the body and the sides squeezed the last breath out of your aching lungs. A medieval torturer could not have come up with an iller-fitting device.
The ends of the line were about a metre apart and the loop about 4 inches from the boom. The hook rested at about epiglottis height so in sailing mode, my chin was millimetres from the hardware. With no room to react, catapults were a way of life. With the lower back totally unsupported, osteopaths around the world rubbed their hands in anticipation of a new revenue stream.
When the honeymoon period was over I quickly realised I’d swapped one set of pains – granite forearms, ravaged hands – for another – chronic back ache and deep soft tissue bruising. And as a means to help refine technique it was a disaster. I’m not sure I’ve ever been the same since.
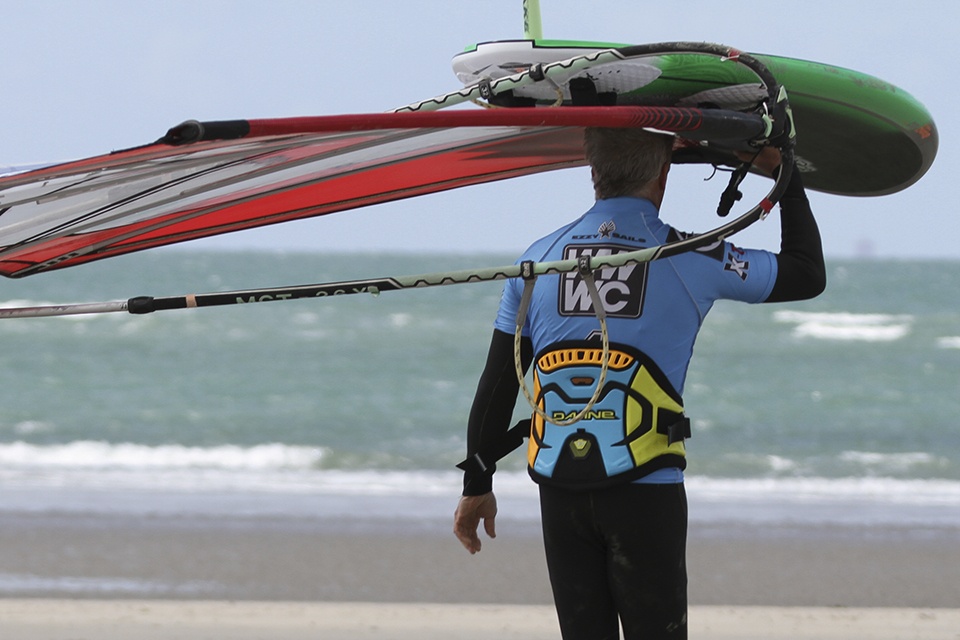
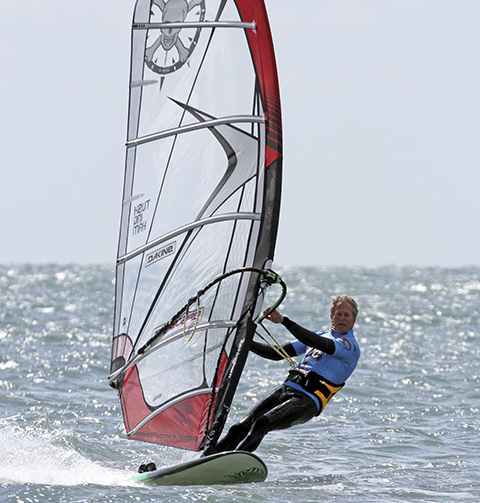
// A good balanced harness set-up is fundamental to everything you do. Without it, you never have the stable platform from which to either manoeuvre or drive the board to new speeds.
WHAT IS THE HARNESS DOING?
The harness should be so much more than just a hand/arm saving device. The truth is that it takes a lot of strength to get a board planing and stay planing without hooking in, because you have to direct a constant flow of power in the board via your feet and mastfoot. That’s only possible through a straight, taught body. If your midriff is shaky, the power gets absorbed by rolls of wobbling blubber.
The harness is like a pylon under a bridge. It shores up your middle section and effectively keeps your core stiff and gets the power through your legs. A harness should be your primary aid to early planing.
THE DODGY HARNESS LEGACY
The message of that rambling anecdote, apart from to bathe in the warm treacle of nostalgia, is that the harness set-up has the power to eternally corrupt. The first time you wear a harness you have little concept of good and bad – it’s all alien. The moment you hook in you instinctively develop a host of new reflexes to resist the forces, which are determined by where the harness is (or isn’t) supporting you. Those reflexes will quickly feel familiar and sort of … right.
For years after my first harness experience, as soon as I felt the power I would arch my back and throw my shoulders back and spread my arms (because that crude chest harness only supported the shoulders). Those are chronic instincts if the harness supports your waist or buttocks (which it soon did). I spread the hands to be ready to sheet out and unhook before the catapult. The habits cultured through a bad harness set-up can last a lifetime.
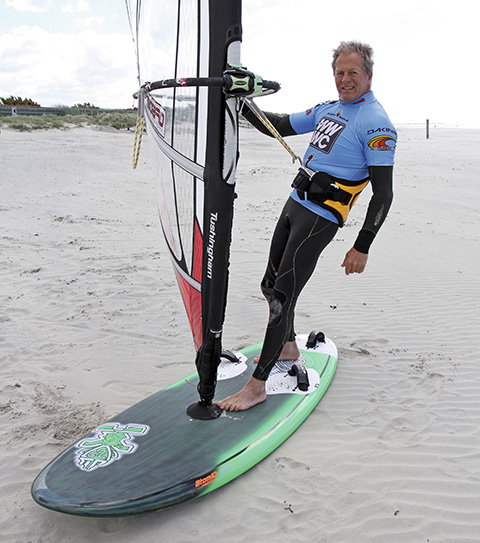
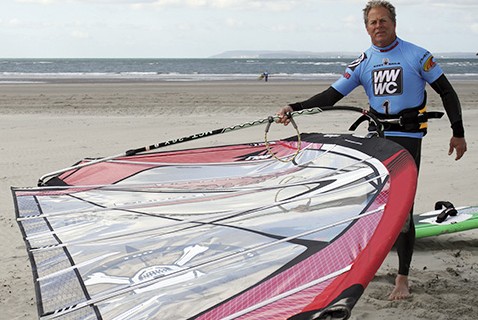
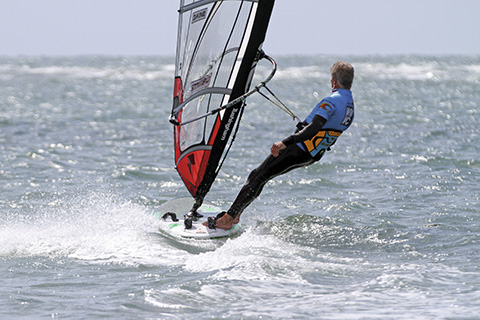
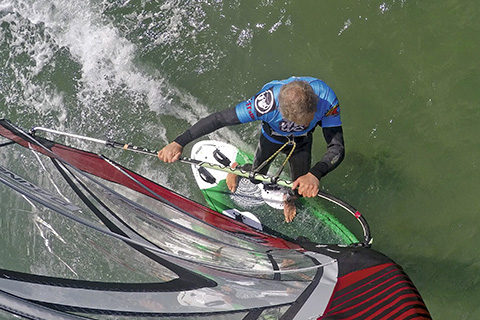
// The on-beach set up check. Can you release the front hand and hook in with the front foot by the mastfoot?
A SET-UP CHECK
This is my standard free-ride, free-everything set-up. The boom is shoulder high because the 120 freemove board at 80.5 cm is quite wide. The key thing is that the harness should be your primary planing tool. For that to happen the lines must be just long enough for you to hook in standing forward of the straps AND hold the rig upright. You feel a little suspended with the weight off your feet (good) and line pulling up a little on the harness, but all will feel well when you take a step back.
Lets not get too dramatic – there are not too many people out there anymore sailing like Quasimodo playing ‘Twister’ but there are plenty who are sticking with a harness set-up just because it feels familiar, even though it doesn’t play to their strengths or help them excel in their desired area of performance.
Joy comes from getting a good start and then experimenting.
No matter the beauty of your natural posture, if your harness set-up is awry, there’s nothing you can do to prevent your ‘super 7’ stance from becoming a ‘twisted 3.’
A SOLID START – AND YET RECEPTIVE TO CHANGE
The question is often asked, when is the best time to start using a harness?
“As soon as possible,” is a popular answer amongst centres keen to give their charges the thrill of effortless planing as soon as possible and so ‘hook’ them into the sport – and perhaps trick the frailer ones into believing that windsurfing doesn’t involve strength.
If the instructor involved is savvy and sets everyone up right, it can all be very positive. By committing to the harness they automatically find themselves in a good stance with the hips at the right height to drive the power at the right angle into the board. But it can also encourage sloth, immobility and defensive habits.
In general my advice would be not to rush it – and that’s not just sour grapes from someone who sailed for 3 years before using a harness and wants everyone to suffer in the same way.
By getting to the ‘almost planing’ stage without a harness, for a start you acquire some specific strength and fitness. You also develop a natural feel for trim and power.
Keen to reduce the effort, you’ll automatically move the hands to places on the boom where they’re equally loaded and get a sense of the sail’s power point – essential when setting up the lines.
You’ll discover that sailing with extended arms is far more efficient than bending them; that having them shoulder width apart is less stressing than spreading them; and that by hanging away you divert the load to the stronger ‘lats’ and back muscles.
On extended arms holding a powered sail, you’ll also discover that it’s easier to sheet in and out by turning the hips rather than pushing and pulling with the arms.
Most importantly, UN-trussed up, you have the freedom to develop naturally the stance that suits your shape and strength, tall if you’re long of limb, lower if you’re more compact etc…
With that level of skill, and it doesn’t take very long, the harness is a totally natural progression. The challenge then is to go for a set up which compliments that natural stance so that you look pretty much the same hooked in and hooked out.
(That sounded like advice for the first timer. However, reconnecting with your unhooked self and sailing out of the harness for short periods, is an excellent exercise for anyone who feels stuck in their harness ways.)
// With your elbow in the loop, just being able to grab the boom represents a good allround line length. For the average male adult, that will be about 30-32’’. For ladies it’s around 28-30’’.

// A 7 metre sail? It’s 7 hand widths to the front harness line from the front of the boom.
// Where you can pick the rig up and balance it in one hand is the balance point – put the line equidistant either side.
// Backwind the sail and where you can balance it with one hand is the position for the front end of the line – not such a good method in a gale.
LINE SETTINGS
If the lines “never feel right” it very rarely is you. It’s almost certainly down to a badly rigged sail, e.g. not enough downhaul or too much outhaul that is allowing the centre of effort to wander. It can also be down to an unstable, ‘flicky’ wind. Otherwise, setting the lines should be a doddle so long as you trust what you’re feeling. There are many methods, some are noted below, which are just starting points. The final tweaks come when you get out there and sense where the sail is pulling from and how it’s loading your body.
STARTING POINT
You need a reliable starting point. The following is absolutely NOT cast in stone. But if someone came to me looking for a rebuild, this is how I’d set them up for all round free-riding. I’ll then look at all the elements and show how changing each one can influence different areas of performance.
The following is for recreational blasting and manoeuvring on a free-ride or freestyle wave board, where you want the harness to help with early planing and offer comfort on all points of sailing.
Type of harness. I’m assuming at this stage a waist harness just because that’s what most have (more about that later)
Boom height. One or two inches under shoulder when you’re standing next to the mastfoot. Up to shoulder if the board is wide (75cm +).
Line length. With your elbow in the loop, you should just be able to grab the boom. For an average sized male that means lines around 30” – for ladies around 28”.
Line spacing. The ends of the line about fist width apart.
Line placement. Hooked in off the plane you should be able to drop front or back hand. As you get up to full planing speed, you’ll feel a little back hand pressure.
Stance check. Off the plane with the front foot against the mastfoot and the back foot just behind the front straps, you should just be able to hook in. You’ll feel a little suspended, swinging under the boom with little weight on your feet. But as you step back into the straps it becomes more comfortable. Standing tall, your arms are roughly parallel with the water and the line is coming out at right angles to the harness, so the force is directed straight into your lumbar.
TWEAKING THE ELEMENTS
Let’s look at the options within that set up. We can surely go no further without addressing the issue of design – seat or waist? I salute the editor, who in the March issue of this magazine devoted a piece to the seat harness, which remains a totally viable option but which is in danger of sinking out of sight in a mire of waist-driven fashion. Currently waist harnesses outsell seats by about 30:1. Why? Mostly fashion but not entirely. Improved design is also a factor. Elsewhere in this piece you will find comments about the seat vs. waist question from all corners but here are a few points to consider.
Don’t worry … It’s no longer such a big issue. Waist harnesses are far better than they used to be and don’t ride up as much. And seat harnesses have higher hooks so the line/boom height set-up is only marginally different. Yes they promote a slightly different stance and attitude but look at a good sailor wearing both and you’d be hard pressed to tell the difference. Don’t over-agonise about it!
Worry … But DO agonise over it if you’re in agony. Those with narrow waists often have problems. The harness doesn’t fit under their ribcage but crushes it, squeezes the air out of them and makes them claustrophobic.
Nick Dempsey (Olympic Silver medal London 2012)
“I use a seat harness on the RSX. I find that anything I need to drive off the fin with, the seat is better. A fully powered up slalom board I’d still use a waist harness for more control. The entire RSX fleet use a seat harness.”
Technique issues
An instructor friend of mine in New Jersey USA stated unequivocally that the waist harness was responsible for killing the sport in that area. Her reasoning was that people were getting to the level of putting a front foot in the strap, and that was it, because the waist harness, with its high hook, didn’t allow them to transfer enough power to the board to fully release it. I feel she slightly over-stated the point. However it is often the case with women. Their higher waists and lower centre of gravity mean that they often fair far better in seat harnesses. In a waist harness the hook is too far from their bottoms. But when they hook into a seat, they connect instantly with the power.
The problem is often body image – a seat harness makes you look like a bumble bee. It’s the opposite with blokes. There are many ‘sit and go’ merchants for whom the seat harness is an armchair that allows them to use their bulk to hold down a big sail and go for miles without moving. The leg straps also plump up their jewels into a most flattering package. In a waist they have to be more proactive – using the legs to drive the power into the harness – and it does encourage them to move.
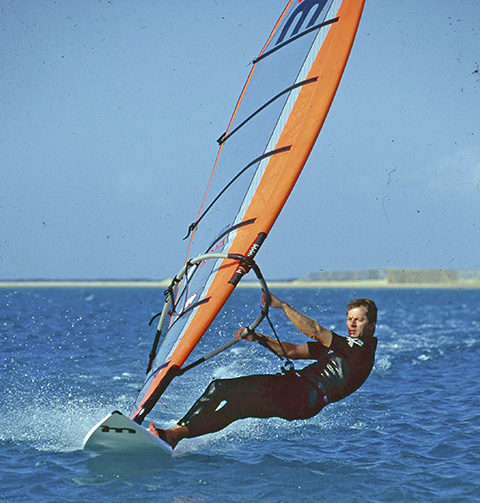
// low boom, short lines, high hips, rock solid with “you shall not pass” tattooed on the forehead. Photo Mark Kasprowicz 1994
// 2015 – equally fast but the longer line set-up making it a lot less frantic.
TIMES ARE A CHANGING
There is no right and wrong in this game. Lots of things work, some better than others. The changes over the years, you might argue, have been prompted by fashion. Perhaps a bit. On the whole, however, things have moved on greatly. The pics below represent a jump from 1994 – 2015. In both I’m blasting on off-the-shelf kit. In the 90s we were obsessed with speed. Most sails over 5.5 had cambers. The mantra was “don’t move, lock yourself to the rig – to move is to lose power.” So wearing a seat harness with a chest high boom and 26 lines, we locked ourselves to the rig with high hips and a straight, immobile body and pushed all the power straight into the rails. Move on 21 years (can you tell the difference?), and it’s all a lot more relaxed. A higher boom, longer lines and waist harness allow a lot more movement within the harness and put you in a far better position over the board from which to pounce.
Boom height
I’m not budging too much on this one. The current trend of really high booms, mouth and above, started by freestylers, is giving people real problems. It makes the lines feel short. Standing below the boom, you can’t help but pull the rig down to windward as you sheet in, thereby rocking back on the heels and losing power. It’s hard to balance the rig and so you have to use your arms. It’s very tiring. Yes with huge sails and wide boards, and in record breaking, off the wind, speed runs, the boom does go up – but that’s because you’re standing a long way from the rig.
Line Length
This is the most interesting adjustment of all. It determines the height of your hips and the angle your feet make contact with the board. Note the technique of course racers looking for the perfect trim up and downwind. They will have adjustable lines going from about 28 – 34 inches. Off the wind the sheeting angle is open so they need the longest line to distance themselves from the rig and hold the hips outboard. Turning onto the beat, the sheeting angle closes. That same long line would drop the hips to water level. It would be hard to sheet in and with the legs parallel with the water they wouldn’t be able to control the angle of the windward edge. By shortening the lines they lift and engage the hips. The higher stance over the edge allows them both to drive the fin and control the lift.
So back on the free-ride kit, if you went for a shorter line, you would engage the power immediately and find it more efficient cranking upwind with the sail closed. The trade off would be that getting planing, going broad and doing any hooked in moves, you’d feel uncomfortably close to the rig.
Lengthening the lines to say 32” or longer – the instant bonus is early planing because you can hook in and move back while leaving the rig upright where it creates the most power. Freestylers and wave sailors go long because it’s all about getting going and then having the maximum freedom of movement within the harness. Those beautiful no-handed, arched-backed back loops by luminaries such as Alex Mussolini are only possible with huge lines. But they don’t suit all because you find a lot of load on your arms and it’s easy to hook out by mistake
Line spacing
My dear friend and fellow coach, Colin Whippy Dixon, borrowed my kit for a spin in Jeri this year. When he came back in, he’d adjusted the ends of the lines so they were an inch apart. “You should try them like that Harty,” he said, “much better! You can really work the sail in the harness and get going quicker.”
I shot him a glance which said: “do you really think I haven’t thought of that?!”
It’s a classic personal preference thing. Colin is always on the smallest sail possible to facilitate the trickiest tricks. 4.2 most of the time despite being a chunky lad, so he’s always pumping in the harness. I on the other hand like to sail more powered up. I like the ends further apart (all of three inches more) because that stabilises the rig a little more.
Line Positioning
The eternal conundrum. Every coach in the land will offer the irrefutable advice: “place the lines so they are perfectly balanced and the apex of the loop lines up with the sail’s power point.” Yes, yes yes – but when exactly? Even on the best rigs, the power will move back as you power up and accelerate. The question is, at which point do you want the lines to feel perfect? My personal view is that over-sheeting is the biggest trim sin, so I like always to feel the back hand when sailing fast, so I’m better placed to hold the sail open in a lull. But it really is very personal. Many speedsters feel the opposite and want to be best trimmed for the biggest gusts.
If the lines never feel right, then it’s a rigging issue. The sail’s effort is wandering and I wager now that you have probably over tensioned the outhaul.
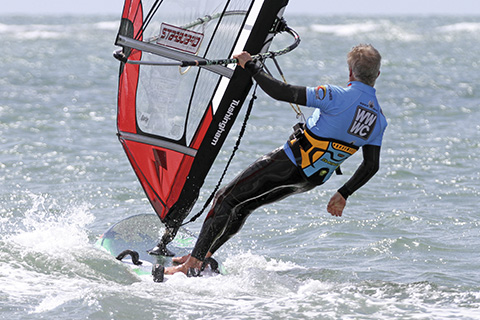
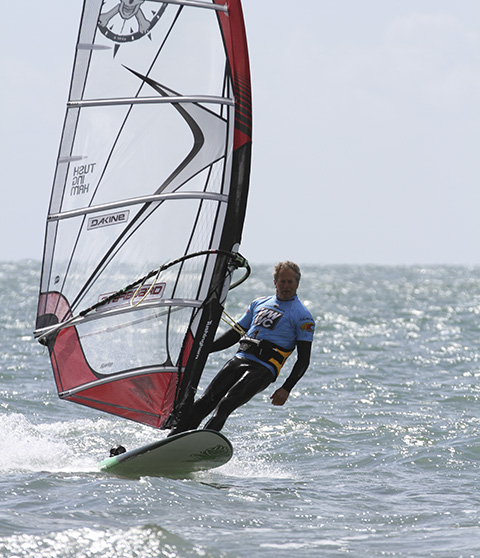
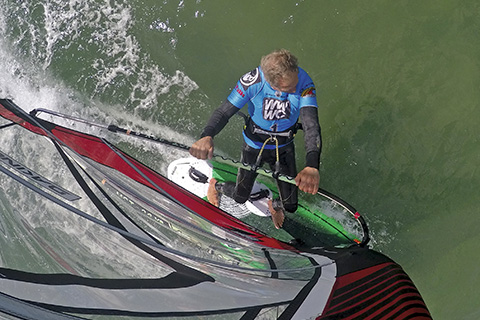
// The moment you hook into a good set up you should be comfortable and able to put a good distance between your front shoulder and the mast.
// Then releasing onto plane, nothing moves apart from lifting your front foot under your knee into the strap.
SWEET TRANSITION
Back in the day when harnesses emerged from torture chambers and rigs were anything but stable, you developed a hooked in and a hooked out stance. In the former you looked vaguely normal with extended arms and dropped hips; in the latter you looked like a chicken trussed for the oven – all tied up and very worried. The sign of a good modern set-up is that if you isolate someone’s upper body you shouldn’t be able to tell if they’re hooked in or out or on or off the plane.
Is the Stance Working?
I urge you to beware of obeying systems too stringently. As you see in the pics, there are ways to check lines on the beach, but these, along with measuring tapes and booms resting on tails, are just starting points.
This whole game is about FEEL! There’s a simple objective. Look at your harness and see where it’s supporting you. Then as you’re sailing, bend and stretch the legs, twist the hips this way and that and find the position where you’re lining the sail’s power up with that spot of maximum support.
Keep feeling where the sail is pulling from and where the load is on the harness.
For example in a waist harness, if the hook is always pointing up and the load is on your ribs and the harness keeps riding up, you need to stop squatting and stand taller. If that still isn’t working, lower the boom.
If the one side of the harness is overloaded, even across the wind, the line is too far back or forward.
As you play with a new set-up, be aware of the position of your hook relative to your feet. In manoeuvre based sailing on boards with tiny fins, you need to sail off your front foot – so most of the time the harness hook should be over that foot – and vice versa if you’re sailing a speedy board off the fin.
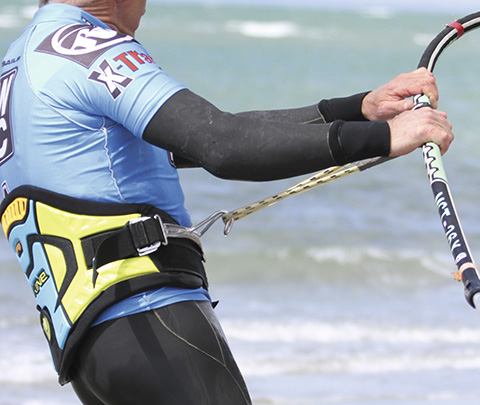
// Should the spreader be able to slide up and down the webbing? I think, especially upwind, it eases the load on the back and allows you to project forward more. I’m afraid again, it’s one of those ‘personal preference issues.’
AND FINALLY – A SIMPLE CHOICE – SPEED VS. MOVEMENT.
The way to go fast is to sail between your feet and limit your movement – in which case you want the harness set-up to hold you rock solid.
But if you wish to turn, carve and generally change direction in imaginative ways, then you want the harness set-up that allows the maximum fore aft and windward leeward movement.
// It might be an over-powered, over-full, under out-hauled sail, but if your back hand has to move back to sheet in, then you need to move the lines back. Primary rule – move the lines towards the aching arm.
// Stuck in the short-lined 80s and 90s, you may be used to throwing the shoulders back and holding the hips high to power up – in which case the more modern, long lines feel way too long and you keep hooking out. Just learn to drop the hips and drive the legs.
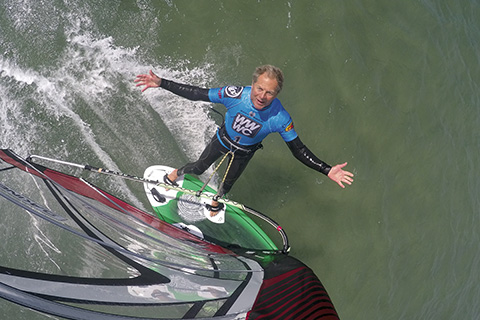
// Balanced joy! For its size this 120 has a relatively small (40 cm) fin, so it’s more comfortable to line the power up with the front foot. Sailing on the front foot, you’re always in better shape to gybe.
THE UGLY, THE BAD AND THE GOOD
The mast mount reveals exactly how you’re lining up with the power and loading hands and feet; and therefore what adjustments need to be made. It’s always interesting to note the position of the harness hook relative to the feet.
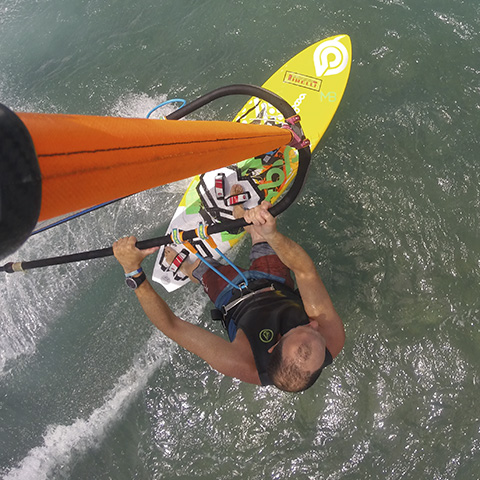
// Simon Basset practising what he preaches out in Maui.
THE SCHOOL’S EYE VIEW
With his school based in the clear winds and flat water of West Wittering, Simon Bassett of 2XS is better placed than many to introduce people to the joys of the harness. “We put most people into waist harnesses – it’s a better ergonomic fit better and puts them in more of a freeride stance, over the board, not driving so much against a single fin. We have seat harnesses and they’re a good option for big sails and big fins. The downside is the restriction around the legs and you lose movement in the hips. And warning!, my friend Sean McGinnis had a moment where a leg strap came loose, he catapulted and got a knacker crushed – never wore one again! Classic mistakes? Mostly boom too high and lines too short – so the stance is bolt upright and too close to the boom. And don’t be in a hurry, my daughter Daisy, aged 12, has developed really good power control and technique by sailing around, almost on the plane on a SUP without footstraps – just like the good ol’ days! ”
// Whitey and Mini Me (his son Reece) both looking very comfortable in a waist harness. But it wasn’t always like that.
A SPEEDY VIEW FROM THE LARGER MAN
I once had to sail Whitey’s speed gear back up the course (he’d injured himself again) and it nearly broke my legs. Our set-ups in the 90’s were poles apart but then so were our styles and shapes. But today, although his speedy bent makes him the prime candidate for a seat harness, he now favours a waist and our styles are no longer so very different. He describes the transition. “Moving from Seat to Waist was a nightmare, tried several times but just couldn’t get any mast foot pressure. I also found the harness rode up and gave up thinking it was down to my body shape (far too good looking). I don’t remember when I finally made the change but it was a few years after their return to popularity, but they had improved in both comfort and grip. I wear the harness low and the hook isn’t much higher than the hook on a seat harness. The one thing that did keep annoying me was having to do the wiggle to lower the harness every few runs or after a poor forward landing where the water pushed it up. While grip is universally good, shape is where your attention should be. We all have different back shapes, most brands will make harnesses with dodgy stances in mind so make sure you try them on. Does that mean the seat harness is dead to me? No, though it only comes out on special occasions, like when it’s windy as hell and speed sailing. Due to the way I wear my waist harness it doesn’t feel like I change stance. So why change back at all you may ask? In reality I probably don’t need to but when the going gets tough I do everything to get my mind in the right spot, just putting the seat harness on gives a sense of security and power to sit on any gust. Apart from those extreme moments, I prefer the waist harness for manoeuvrability, comfort and most of all it doesn’t package my nether region like a valentines advert”.