JEM HALL
MOVE ON UP – WINDSURFING TECHNIQUE
GYBING DRILLS & SKILLS
This month I aim to help those of you not yet carve gybing, or perhaps making only a few and wishing to add consistency. It will also help those of you already gybing and wishing to make them smoother and better.
Words Jem Hall // Photos Nicolas Jones
www.jemhall.com
(This feature originally appeared in the April 2018 issue of Windsurf Magazine. To read more features like this first, Print and Digital subscriptions are available.
Prices include delivery globally for 10 x issues a year!)
My tips to follow are taken from how my students learn to carve gybe on my clinics and the skills they actually do both with me and upon their return to sailing on home ground. I will also give you simple principles to visualise and work on. Do not underestimate in your learning process the power of looking at pics, or watching videos of good carve gybes and then visualising yourself in these positions. Our mind is indeed our biggest muscle! The gybe is best learnt in stages and we can conquer this tough move if we have all the basic ingredients to ‘bake’ the gybe ‘cake’. We should also only focus on one phase (part) of the gybe when looking to improve the whole, for example the preparation or the middle transition. In fact on a coaching clinic I will only empower my people to gybe once they demonstrate that they have all the skills that they require and only then, after a few positive attempts will I give them more info. (the ingredients) for the next stage.
Further articles will expand on the gybe and then onwards onto how to really improve your gybes! The gybe is a thing of absolute beauty and as it is said, ‘If it is worth doing, it is worth doing well!’
“ Light wind gybes are the ultimate carve gybe skill builder. ”
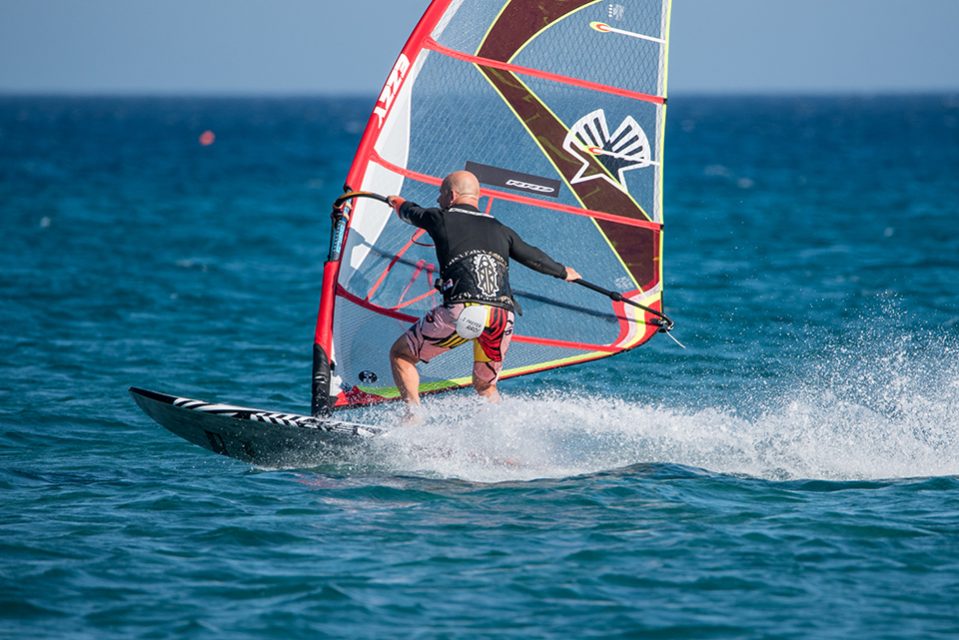
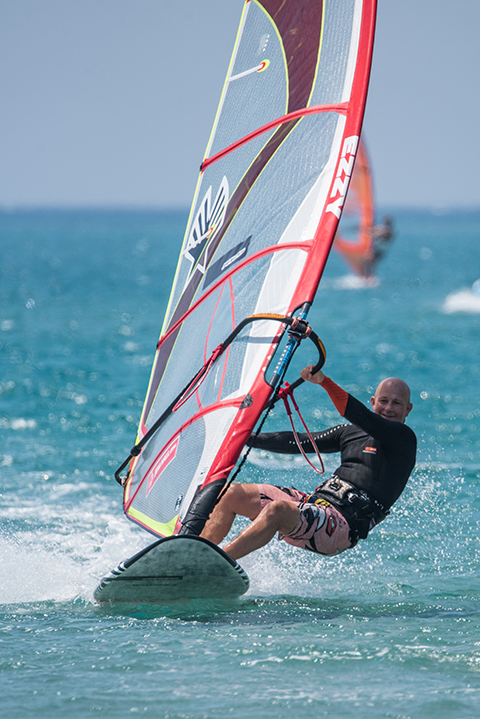
1. Back hand slides back (further than this), board is flat and lines should be tight. Spot your space to gybe.
2. You have unhooked by bending your arms and you are pulling down on the boom and ready to scissor to gain speed and be ready to carve.
3. After the scissor and with a light sail and flat board, you are ready to begin to roll into the carve as you bend your ankles, feel the rail and begin carving.
The drills
Do these drills, build skills, and sail with a focus and a game plan and look to get coached, or self coach yourselves through them and you will be taking an active part in your gybe journey.
Preparation
By failing to prepare, you’re preparing to fail and many gybes come undone at the very beginning, and mine too. If your target is to learn or improve your gybes then focus on these skills that follow A LOT.
Principles first
• Backhand waaay down the boom. The most important principle in many many moves. Aim to hit the boom clip on a 140 – 160 boom.
• Front hand back on the boom. In close proximity to the front harness line.
• Get down James Brown. Be low before unhooking. Think ‘arse in the sea’ and harness lines tight like piano strings. This commits you to the sail’s power, keeps speed and facilitates easy unhooking.
• Unhook by bending your elbows from your low position. Do this and you stay low and upset the board less.
• Always hang off the boom and keep pulling down on it when unhooked. This keeps the board flat and you away from the rig. TIP: weight the front foot to lighten the back foot for a slick release from the back strap.
• Back foot back and on the rail. The back foot can come out pre bear away (or during) but it must be back and next to the back strap.
• Scissor/steer a flat board into the gybe. Turn the board downwind (bear away) by pushing through your front leg and pulling through your back leg to gain speed. This means not carving till your board speed is up. The sail will lighten and the rails able to be carved smoothly.
Unhooking Drill
Sail along and get very comfy sliding your back hand way back and then slide it back to the sailing position. Did you stay low? Were you looking forward throughout? Now whilst sailing across the wind, (or slightly upwind if well powered) slide the backhand back and following our principles, unhook and keep speed and then hook back in and return to your sailing position. This also improves your early planing, gybe exit and getting in the footstraps. This move is a lifer and a future booster.
Scissoring Drill / unhooked
After competency in the previous drill, unhook, be low and scissor (steer) the board off the wind 10 – 15 degrees. Push through the front leg and pull with the back leg, log what you feel and dial in what works best. Did you stay low? Was the board behaving? Did your sail lighten? Feels great when done well.
Light wind gybe
Let’s kick off with some questions. Are you doing these? Are they good? Do you understand the main steering actions and key positions? Can you sail clew first? If your answers are not all yes then learning to gybe will be an even bigger challenge. Steer through a gybe (on a big board and small sail) non planing and make a smooth foot change into a clew first position and then rotate rig boom to boom without looking at it.
Clew first drills
Steer the board with the sail through 360 degrees in the shallows and rotate the sail and keep it flying throughout and avoid looking at it and aim to pause a while at clew first. This is when the back of the sail is actually your front edge. This drill helps not only your gybes, but also wind awareness, beachstarts and waterstarts. After competency in this, learn to clew first beach start. Lots of great info and tips on this in my Beginner to Winner DVD.
Kit
Generous straps to allow you to carve and have a smooth entry and exit from them for foot changes.
Long lines enable you to sail fast over bumpy water and with your front hand back, which aids getting rig forwards and across in the gybe.
Well rigged sail that has control and will breathe for you and work with you.
A board and fin that are not too big as this makes carving easier.
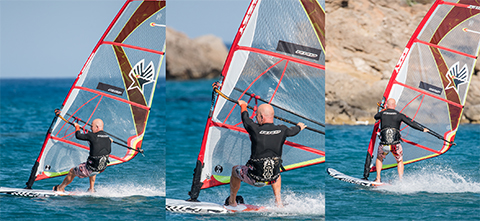
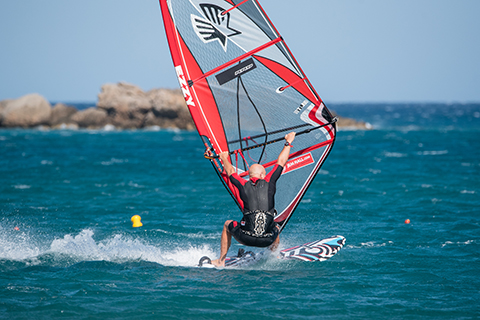
CARVING
‘Roll into the carve by ‘catapulting’ yourself up and into this position’
MID PART
‘Hands back, looking out of the turn. A smooth foot change is aided by practicing it a lot in light wind gybes.’
PREP AND UNHOOK – ANOTHER ANGLE
‘Get down James Brown, prepare well, keep speed and then scissoring into the gybe is easy.’
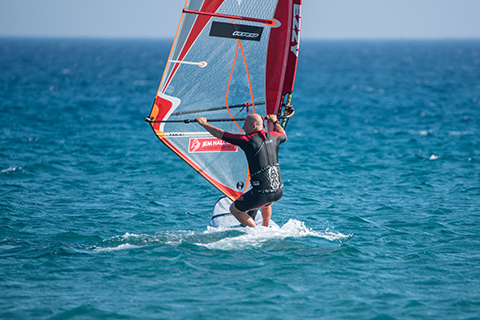
CLEW FIRST AND EXIT
‘Clew first control and wrestling is necessary for making and improving gybes.’
LIGHT WIND GYBE
‘Light wind gybes are the ultimate carve gybe skill builder.’
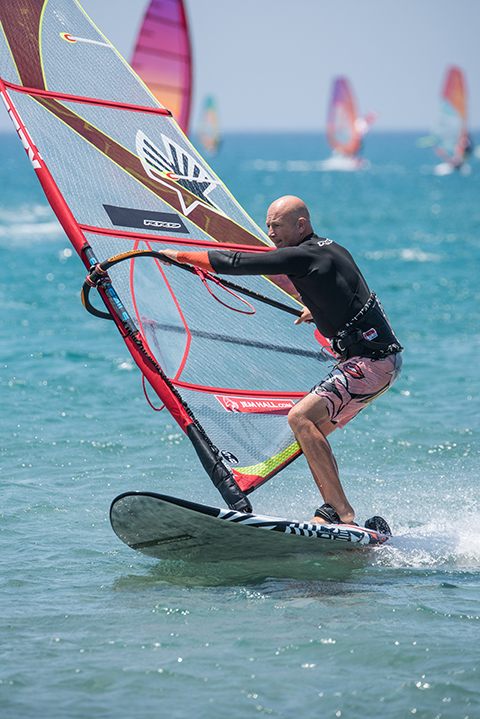
Carving Deep Joy
The carving (second) phase of the gybe represents quite a small part of the whole move. You’re actually only carving momentarily before you’re into the middle part (sail opening and foot change) and then into your exit phase. Yet this is where you can really lose heaps of speed that you’ve built from mastering the Drills and Skills mentioned previously in your quest for Preparation Domination. Oh yes, you are the pilot and not the passenger.
Principles first
• Catapult yourself forward and across into the carve. If you pull in on the back hand subtly and push the rig forwards and slightly across you it will pull you up from your low position in readiness to roll into the carve. This helps keep the board flat.
• Roll into the carve. The previous action will let the rig pull you up and then into the carve and now you must go with it, this feels weird at first and if you do it then you have made a breakthrough you will use forever! Soften and then bend at the front ankle and shift weight to the ball of your front foot as you follow and go with the rig.
• Keep your front arm extended. The rig is away so it drives you and the rig forward and engages the rail. Aim to see the water in front of you. Note, the sail is pulled in with the back hand, but not excessively so until you’re better at gybing and going into them at full tilt.
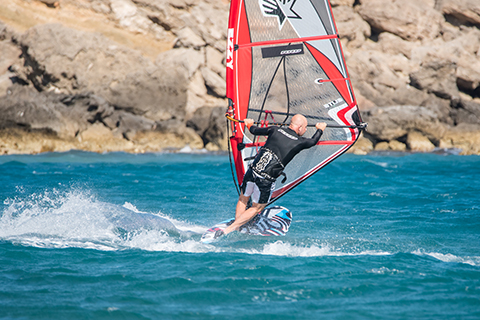
Drills to build carving skills
Rolling
I have presented the principles to follow, so now with your preparation skills in place aim to roll forward into a gybe attempt. Your only focus is to prepare well and then roll. Your target is not to gybe, it is ‘Roll with it.’ Once there, feel what you have to do to carve the board and once you have done this 10 – 20 times, well then you will understand a lot of more of what I am talking about when it comes to the next phase.
Foot steering
In order to further refine your knowledge of how your board’s rails work and your carving skills then you are advised to perform unhooked carving in the straps. Move your hand back, but not all the way, unhook smoothly and them aim to come up onto your toes and carve through your feet, first downwind and then upwind. These are shallow carves and it should feel both dynamic and fun.
Please note all these tips are not exhaustive and there are many more but these are the ones my students and I feel are the most important and deserved of your utmost attention and focus. Nail them and you will be ready for the next phases and the full gybe. They will help you moving forward in the key early phases and your existing gybes will feel a huge benefit!
Pre Gybe Skills
You really need the ‘Trinity’ to nail the gybe, these are:
• Early planing. This means more attempts and on smaller more responsive boards and sails.
• Wind range / sailing fast. These both give you a lighter sail and the ability to keep upwind.
• Get upwind. You are then in a position to feel confident to scissor downwind into your gybes.
Tacking is also hugely important as it keeps you upwind in gusty conditions and builds more skills than you can ever imagine.
RRD boards, wetsuits & softwear, Ezzy Sails & Black Project fins sponsor Jem Hall. Get him live and direct on one of his highly acclaimed coaching holidays but be quick as they are selling out – check out his fab new site www.jemhall.com for details. You can also follow him on twitter / Facebook / Instagram.
www.jemhall.com