
JEM HALL
MOVE ON UP – WINDSURFING TECHNIQUE
LIGHT WIND STYLE
From our July Issue Jem Hall, and his photographer / assistant coach, Nick Jones (Eye Sea You Photo), give us light wind freestyle tips and inspiration.
WORDS – Jem Hall // PHOTOS – Eye Sea You Photo
Jem Hall – This month I look at how embracing a bit of freestyle in light winds can help boost your skills. I will propose what moves are worth investing in, and why, along with providing some simple tips for each.
WHY?
“Why indeed?” I hear you ask. Well, embracing and improving some achievable light wind moves will benefit you in these ways:
- Mentally: it will be a refresh from all the tacks and gybes and will really develop your ability to think on your feet, problem solve and most importantly, self-coach.
- Physically: your balance will be challenged and developed, and you will keep your hands tough and gain some windsurf fitness. The latter can be a particular bonus if you have long breaks between planing sessions. Finally, your move recovery skills will really get a boost and this will help you in all aspects of our great sport!
- Socially: it can be fun to nail these skills with friends, so recruit some others to your mission or seek out other like-minded people. As with SUP paddling, it all happens a bit slower, so you even get the chance to talk on the water since you are also able to stay closer together.
- Developmentally: the core skills of the moves I will present are best learned in light winds and then you can look to nail and enjoy them on planing days with smaller boards.
THE BIG FIVE:
The following tricks are the main light wind freestyle moves I coach on my clinics. My students enjoy them and the skills they gain are plain to see in subsequent planing sessions. I will explain how they help you and why.
- Front to sail: this is a ‘gateway’ move, hence its position in this list. Own this and it will help your tacks, stabilise you before the heli tack rig rotation, and open up the possibility to complete downwind carving 360s.
- Heli (copter) tack: this has so many different skills throughout that will challenge and develop you. The rig rotation and footwork will really boost your gybes. Get it right in light winds and you can use this very useful move on planing days.
- Upwind 360: this will utilise your heli tack skills and take them further. The actions performed feature heavily in the majority of planing freestyle moves like the flaka, for example. And the last punch out of the rig and weighting of the upwind rail is just like a top turn on a wave.
- Ducking the sail: learn this in light winds and you will then be armed with the skills to bring out for the planing version. It will also give you more practice at clew first sailing and sail rotating. Plus it requires some strength and commitment, which never goes amiss!
- Boomerang: this last move has less function than all the others, but its inclusion is to offer you a fun move that feels good.
So now to give you some simple tips for each. This article is less of a comprehensive ‘how to’, rather it is here to inspire you to give them all a go and appreciate what you can gain from doing so.
FRONT TO SAIL
This is sailing on the ‘wrong’ side of the sail and in effect learning how to steer and control power this way round. There are 2 ways to get into this position: either by holding course and stepping around to the other side using some tacking footwork, or you steer through the wind, using your feet, keeping the rig back and then learn to bring the sail across and take power in its ‘backwinded’ position. Learn both and the latter will help you learn to heli tack.
Here are some key tips:
- Persevere with learning to take the board through the wind using your feet.
- Once in the sailing position, ensure your back foot is down the board and that you sink the windward rail; both actions will track the board upwind.
- Look forwards and upwind (where you look is where you go).
- Have your hands close together and near the lines.
- Learn to steer through your feet. Back foot pressure takes you upwind, front foot downwind.
- Control more power by pushing the rig further down (away) and back, whilst being strong on an extended front arm.
- Get out of this position by turning towards the wind, combining back foot pressure with leaning the rig back. Push out on the back hand to bring the rig back upright and then draw the rig across you with your front hand as you steer through the wind to the new direction. This exit steering downwind is just as you would do when coming out of a tack.
- Do it both ways, as for all these moves!
If you want more tips for this, and the heli tack, then examine my “Heli Tack Time” article on windsurf.co.uk or in the June 2016 issue of Windsurf. #
-
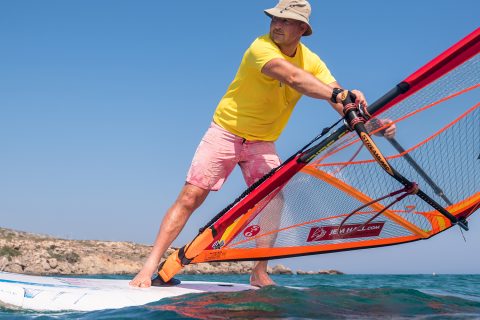
- Look forward, rig back and down, weight your toes and you will own front to sail.
HELI TACK
This is a big move and when you crack it and own it you will be so glad you have it. You really need to consolidate your front to sail control and steering. Done it? Then you are ready to ‘heli’. Here are some tips:
- Head into wind like a normal tack, and steer through the wind using your legs and being subtle with the rig.
- Stay on the same side of the sail and move it to a backwinded position by bringing the rig across you to get into the front to sail / sailing backwinded once through the wind.
- Look forward and get into a dominant front to sail position. Aiming to be stable sailing slightly upwind.
- Slide the back hand down the boom and put pressure on it to start rotating the sail, this will steer the board off the wind, so it is on the best course to rotate the rig.
- Slice the rig forward and rotate it, as you keep looking forward and not at the sail.
- Just before the rig rotation weight the back foot to help the front foot to step back as you bring the front arm in to keep the mast upright in the rig rotation.
- Look forward and not at the sail!
-
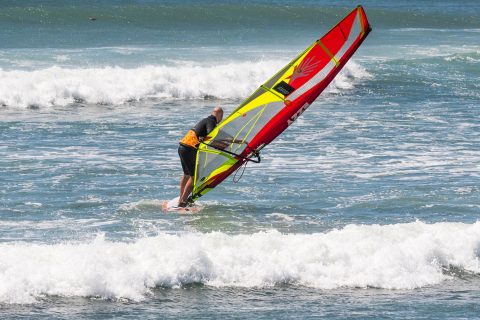
- Own front to sail, nail the heli tack and then you can use both skills on smaller boards and on more challenging days.
UPWIND 360
A tutorial (“Carve that upwind 360”) on this move, and the planing version of it, is online at windsurf.co.uk and in the July 2016 issue of Windsurf. Here are some tips on how to take your front to sail skills even further and spin around 360 degrees:
- Vision: from front to sail really look over your front shoulder to twist your shoulders and your hips, which will help the board to steer faster with your feet.
• Steer: taking a wider stance will exacerbate your steering as you look to scissor the board, pulling with the front foot and pushing with the back foot. Therefore take an extra step back from your normal front to sail position, this wider stance will give you more leverage and better steering. - Extend & bend: get the rig away on a straight front arm to speed up the steering, this will put the rig more across you and to the outside of the turn. Bending your back arm (think thumb in ear) to pull the sail in will sheet it out and depower the sail, this will also speed up the steering.
• Go! Go! Go!: once you have steered to just past downwind on the new direction it is all change as you aggressively bring the rig upright by bending your front arm and punching out hard on the back hand. - Finish it: As you punch the sail out look upwind, let you back hand slide up the boom and open the sail as you get your weight low and on your heels. One option if you have too much power is to let go with the back hand as this will spill the wind fast.
-

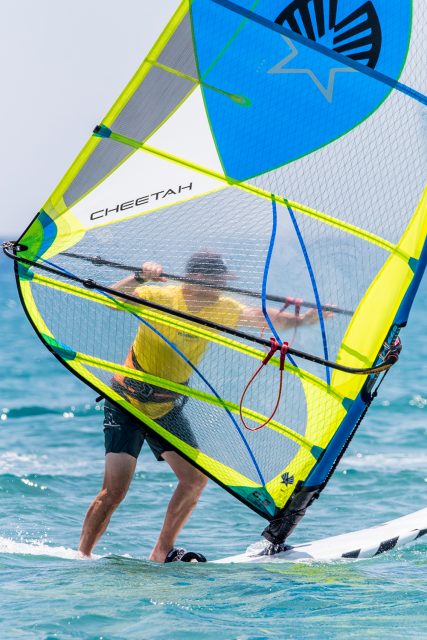
- Learn the duck gybe in light winds and then use this to learn / improve the duck gybe in planing sessions.
-
DUCKING THE SAIL
This move, and the planing version of it, are covered extensively in my article “The Duck Gybe”, online at windsurf.co.uk and in the Nov. / Dec. 2018 issue of Windsurf. Here are my top tips for the light wind ducking of the sail:
- Direction: a bit off the wind to get a little speed and to make the rig work easier.
- Get back: slide your back hand down the boom. Release your front arm and cross it over to reach the very back of the boom. Once you release the front hand, tip the rig forward with your original back hand to make this easier.
- Get physical: with your hand now at the back of the boom, really pull hard and across you. It is like you are trying to wipe sweat from your brow.
- Get ready: look to catch the rig clew first and be ready for the power by dropping down lower.
- Stabilise: ensure your hands are in their usual clew first position and sail along like this. This being, back hand well down the boom towards the clew and mast hand close to the front harness line.
- Choices: you can now either rotate the rig or do a clew first gybe. The latter helps your hips, footwork, vision and steering for a planing duck gybe.
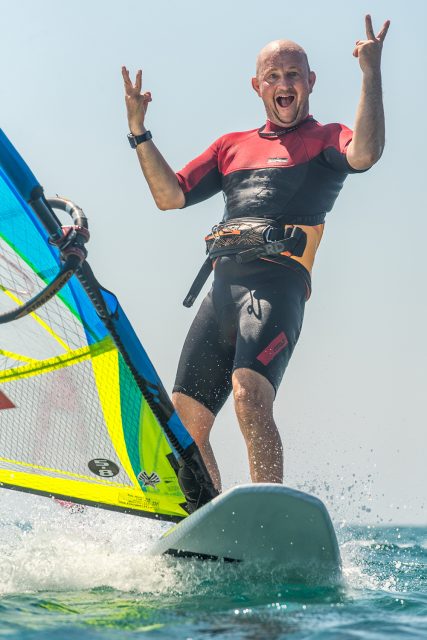
BOOMERANG
As I said before, this move is just fun and it is about sailing along and throwing the rig away from you subtly so you can then use the wind to, in effect, bounce it back to you. It is also called the ‘floater’.
Here are some tips:
- Start small: first attempts are just a little push out on the back hand as you cast the rig forward to the nose of the board and then catch it after it comes back to you.
- Change direction: as you gain more confidence, and technique, start the move slightly off the wind and then as you throw the rig forward, steer the board into the wind slightly with your feet. This will get the wind even more on the wrong side of the sail so it pushes back to you.
NICK’S NUGGETS
Nick Jones – Windsurfing SUP sessions are brilliant at building skills. I have seen it so many times on Jem’s clinics. On a light wind morning session he sends everyone out on big boards and small sails to practice the things he has mentioned in this article. Many is the time that in the afternoon windy session, someone comes off the water stoked at nailing their first duck gybe, genuinely surprised and pleased. Light wind sessions can be a game changer.
For me, the windsurfing SUP has made me much better at getting planing early. I learn how much windsurfing is a ‘pulling down’ sport, not a ‘pulling in’ sport. By sailing unhooked, I get to feel where the rig wants to be – sailing with hands close together the sail will just naturally shift to its equilibrium and I was surprised by how open the sail wants to be. This knowledge helps me to get planing earlier and (more importantly) helps me to keep planing in the lulls.
Another observation is that in light wind it is the time to play. Watching the young guns in Jeri, they have so much talent, and a lot is derived from just playing around when they are sailing and not being scared to fail. For the average sailor, our sailing time is confined by job, family, friends and then a suitable forecast, so we can put a lot of pressure on our sessions. The idea that in these sessions, “I’ve got to make the most of it”, often equates to long runs with a gybe at each end. The windsurfing SUP opens up more sessions to you and it is a no pressure session, in fact it’s your own ‘expression-session’. So go play and learn!
Kit:
Leave the harness off, you will not need it and this also helps your fitness and feel for the sail.
Balanced floaty boards, for light wind love, like a big freemove or a windsurfing SUP.
I favour the windsurfing SUP as it tracks upwind nicely and you have to boss it around a bit, which helps develop your skills.
Ensure the fin is not too big on the freemove so it will steer more easily.
Flatten your sail so you can control it more.
Ezzy sails, RRD (boards, wetsuits & softwear), Chinook & Black Project fins sponsor Jem Hall. Get him live and direct on his coaching holidays, see www.jemhall.com for details. You can also follow him on twitter / Facebook / Instagram.