Words Peter Hart // Photos Tris Best, Simon Bassett, Hart Photography, Graham White, Brett Kenny.
Originally published within the May ’18 edition.
Of all the tricks on offer, they’re arguably the least functional, but the learning of the up and downwind 360s can open the door to a new technique world, as Peter Hart explains.
On the last afternoon of a windy holiday, James completes his first proper planing gybe and not being short of a penny, puts his credit card behind the bar. The celebrations continue long into the night. He’d been waiting for this moment for 10 years – and yet he sips his Champagne with a twinge of guilt for he knows his euphoria is fraudulent. Yes he had sort of succeeded … but he hadn’t actually improved. His last gybe of the week was fundamentally the same as the first; except in the planing one, he’d somehow been touched half way round by something beyond his control – a building gust, the hint of downslope, a divine prod – whatever it was, he found himself with a knot or two of extra speed at rig and foot change time, and therefore an extra second in which to grope, grapple and lunge his way to the new tack just before he fell off the plane. Whoopee! But it wasn’t something he was liable to repeat any time soon. All the old mistakes were there – choking the rig with the front hand, sheeting out, leaning back, staring at the mast, carving too much off the tail. It was so depressing – but thankfully, right then, he was too pissed to care …
The hopeful Levi
Paul sails waves with courage and guile. He goes out in anything. However, a part of the final jigsaw is missing. He’s got plenty of pics of himself dwarfed by mountainous swells – impressive – but the problem is he’s not so much ripping them as bouncing around in front of them atop a barely-banked board with all the commitment of a non-swimmer creeping towards the edge of the diving board. What he craves is that money shot of him looking like Levi Siver in mid bottom turn, board at right angles, edge buried up to the nose, rig laid forward and flat to the floor, looking along the mast at the curling peak he’s about to smack – a study of calm control and dynamism. But whenever the stars align and he’s in position to crank towards a steepening unbroken wall, he just can’t get himself to commit forward. It doesn’t feel right, natural or even sensible.
Hateful Reflexes
James and Paul are basically a sandwich short of a full picnic in the skills department. They both want to speed up their carving turns by getting onto the front foot and laying the rig into the turn – but they can’t because they have a faulty reflex, which is always to oppose the power rather than go with it. They push the rig forward to initiate the turns which powers it up and pulls them forward – good so far. However, the moment their knees, hips and shoulders drop in front of their feet, the catapult siren starts to wail and the mortgage-paying part of their genomes makes them sit back, rest their chins on the boom and open the sail.

Relationship Therapy
We are not here solely to sort out the issues of James and Paul. However, their issue is a fundamental one encountered by most free-riders looking to stretch up to the next level. Be it faster gybes and slalom sailing, freestyle or waves – they need to change, or at least extend their relationship with the rig. Currently it’s all about resistance. All the first stages of windsurfing, steering, getting planing etc, are about putting the rig in a certain position and then resisting the power – and resisting by always leaning back. They’re a slave to the rig – sounds a bit desperate, but when the pressure builds through either a gust or a change in direction, they react to it rather than predict and control it. If you’re reactive, you can never be totally in charge.
The skill that’s generally absent is the ability to depower in the turns by over¬sheeting and / or dropping the rig into the turns. There is a simple chain reaction. Unless you can hide the rig, you will never get on the front foot and lean forwards towards the force that is apparently trying to pull you over.
“ Completing a move for the first time is great, but is not a reliable barometer of technical improvement. Changing a habit is. ”
HOW?
Irony alert – the best way to master a move is often NOT to practice the move you want to master. People have rehearsed their flawed gybes and bottom turns so deeply that the pathways are set. This new skill is a very ballsy action and not one they’re likely to magically acquire just by plugging away. Furthermore, especially in the case of the bottom turner, there are scary environmental confining influences, like a wave that threatens to engulf. What’s needed is often a blank sheet – a new focus, a different move that forces them to train a new element. They need a bit of freestyle. They need to spin.
THE UP and DOWNWIND 360s
I’m in no way guilty of hyperbole when I state that if you can master the end form version of the up and downwind 360s, that is to say complete them with both feet in the straps the whole way round, you necessarily gather the vast majority of skills required to excel in manoeuvre-based windsurfing, that is to say wave sailing as well as old and new skool freestyle. In no particular order, these relatively simple tricks force you to adapt in the following ways:
Open the footstraps, locate them inboard so that both feet straddle the centre-line.
This is a wave and freestyle setup that allows you to trim the board on and off the plane with toes and heels. It means you can use the front foot to carve – essential in waves and a skill which is not possible (or at best very awkward) in the outboard straps. Does this mean you’re forced to buy a wave or freestyle wave board? Well variations of both moves are possible on freeride kit, but the purpose of all this is to encourage a new way of trimming, sailing and manoeuvring … so you hear what I’m saying.
Extend your cage of movement.
This is key. The powered up freerider, when sailing and gybing, often barely moves out of his tiny cage above the footstraps. In the 360s you have to stretch head, shoulders, hips and knees way out, in front of, behind, to windward and to leeward of the footstraps to trim the board and control the nose on various points of sail. It is the mark of the skilled wave and freestyler how much he or she moves while still in the straps.
Carving and trimming in both FRONT and BACK straps.
This is what you’ll be doing when wave riding and performing most new skool tricks – you must get off the back foot and learn to use the front foot as a platform.
Stay oriented to the wind direction.
“Where the hell am I?” It’s a cry often heard by wave sailors the moment before they get flattened. So focussed are they on riding the wave, they lose sense of the wind direction and where their rig should be in relation to it. In 360s you have to be constantly aware of the wind direction so you know when to drop the sail and then pick it back up again to finish the move. The best indicators are the rolling ripples. Keep studying their direction all the way round. For a start, that puts your head in the right position and stops you staring at irrelevant objects, like feet and boom.
Different and compatible
The up and downwind 360s have a lot in common but also demand different skills. The downwinder is mostly about developing sensitive carving feet and adopting really dynamic body angles at speed. The upwind 360, like most upwind tricks, is more about rig skill (especially backwinded power control) as well as extreme body trimming angles. Why I group them together is because you can practise them together. Who sails in a perfectly constant wind? Certainly not me. For the downwinder it’s best to be on the slightly ‘over’ side of perfectly powered because speed is your friend. For the upwind 360, it’s easier to be slightly under. No one chooses to do a tricky upwind transition overpowered. Mix it up. On the way in, register your power and choose the trick accordingly. Let’s kick off by going downwind.
OLD SKOOL 360 – The Big Step
In the 80s and 90s we were obsessed with laying rigs down, be it in bottom turns, ‘lay down’ gybes or 360s. The original move was not so much a carving 360, as a bit of a gybe, followed by a lunge as you stepped forward to control the nose – and then a lengthy intermission as you tried to sail a near static, sinking board through the last section on the wrong side of a violently backwinded rig. The in straps version is all about carving.

Finishing one off a wee while back – the big step forward was necessary thanks to skinny tails – and what I remember most fondly was the foot of the sail rubbing the scabs off my back leg’s shin. PHOTO Hart Photography
The more modern ‘in straps’ version is potentially far smoother. The challenge is holding that nose to tail trim all the way round. It’s all in the front foot. PHOTO Graham White
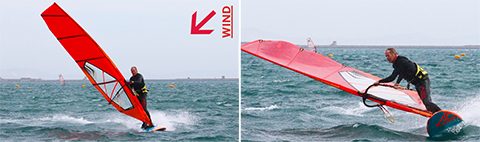
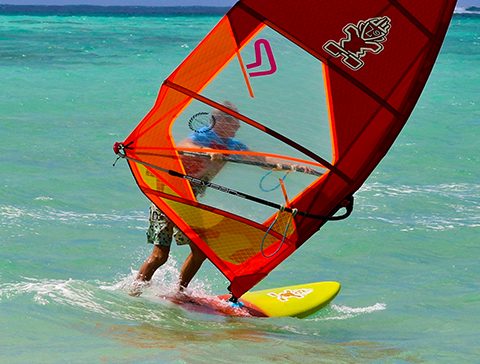
THE DOWNWIND CARVING 360 – the joy of holding an edge
The glory of the downwind carving 360 is that although it’s almost as old as planing itself, it’s never gone out of fashion. Speed is addictive but what is arguably more so is that fabulous sensation of holding an edge. The problem with the carve gybe is that it doesn’t last long. After just 2 seconds, if you’re doing it right, you should be into your rig and foot change. In the 360 you can enjoy the carve for twice as long … and because you’re not distracted by foot and rig changes, you can really focus on what’s going on under your feet.
The skill of edge control – watch Kelly.
We talk a lot about the technique of gybing but not so much about the skill. Watch multi world surfing champion Kelly Slater generate ridiculous speed in small mushy waves while ripping them up on a tiny 5ft board. What you’re watching – but maybe not seeing – are the subtlest of skills as he moves from front to back foot to engage different parts of the edge at different stages of the arc, pressuring toes and heels just enough to make the edges bite – but not so much as to make them stall – and then releasing that pressure before the edges trip.
When we learn to gybe, the approach to carving tends to be a little agricultural – take back foot out, stamp and hang on. Like a cart horse being given a dig in the ribs, the thick rail and tail of the freeride absorbs the hoof and bumbles off in the desired direction – but there’s a shortage of finesse which plagues the user as they move to smaller more sensitive boards. The great thing about the 360 is that by laying the rig down, you effectively get rid of all the power, allowing you to focus entirely on carving the board, feeling how it reacts to different pressures, how steeply you can bank it, what’s the optimum speed, what’s the best turn radius etc. The photo sequence reveals the technical details but let’s add a little flesh to those pictorial bones. For a start let’s plan the event.
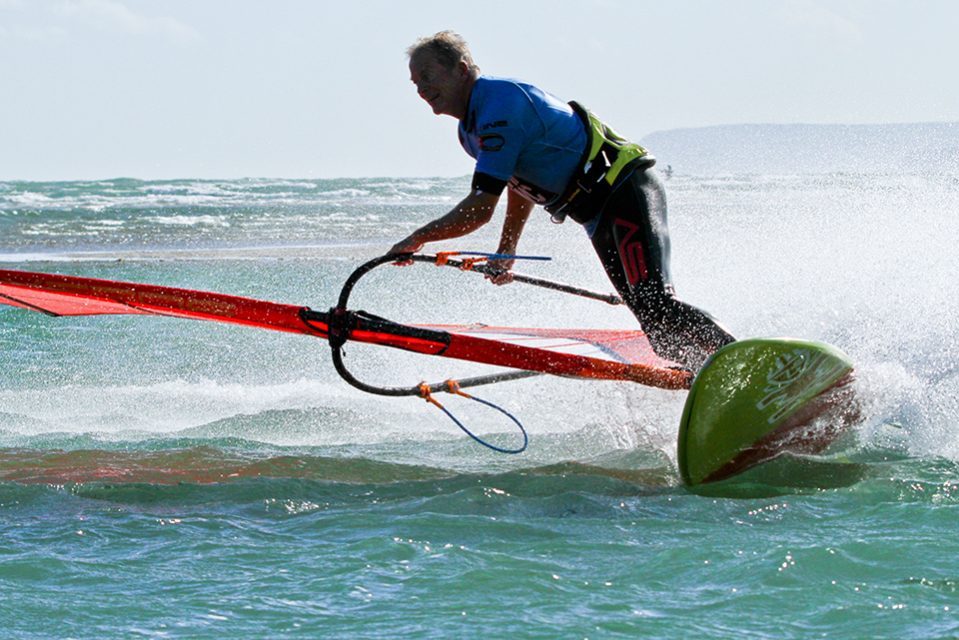
One of the funnest times to chuck in a 360 is when bearing away onto a swell on the outside. Check the back foot – there’s so little pressure it’s lifting off the board. PHOTO Graham White
Kit and conditions
The most exhilarating time to roll out this trick is on an 88 ltr wave board with a 4.7 where you scream out onto the flat in front of an about-to-break swell and aim to complete it just as the wave picks you up again. But on a small board in that much breeze, the room for error is tiny. The best option is a fast freestyle wave about 10-20 litres more than your weight in kg (100 ltrs for the 85 kg rider); about 18-25 knots of wind and a rig that leaves you fully powered … but not hanging on. As with most freestyle tricks, rigs much over 6.2 restrict movement and make everything harder. And most important of all, the flatter the water, the more you’ll feel like committing.
Control the nose – forward forward forward!
Focus on the ending. As you carve round and head back upwind, you will lose speed. You know what happens if you lose speed when you’re in the straps –
you sink. Therefore from the moment you kick off this thing, think about controlling the nose through mastfoot and front foot pressure. Lean forward as far as you think you should – and then double it.
The right speed and the tightening arc
I remember learning this trick in 1983 with early freestyle champion Dee Caldwell in Gran Canaria with 3.7 sails in about 35 knots of wind. We were carving in hard, but failing to carry momentum all the way round. More speed required surely? So we’d bear away onto crazy broad reaches – but that didn’t work either. At warp speed the rails created so much lift that they skipped and bounced the second we tried to bury them; and that speed forced us into too wide an arc.
Speed is necessary – but it has to be the right kind of speed – not your best GPS run – but good speed relative to the wind, where you feel the apparent wind direction swing forward as you bear away and the rig lighten. There’s no need for a lengthy broad reach – it only takes 2 seconds to accelerate.
It’s a tightening arc that helps you maintain carving speed – and you can’t carve tightly if you’re totally on the edge. The best way to NOT complete a 360 is to ease off the pressure as you bear away and widen the arc out downwind – you’ll be backwinded on a broad reach and get drilled. Once the edge is set, aim to get it round as soon as possible … but NOT by slamming off the back foot.
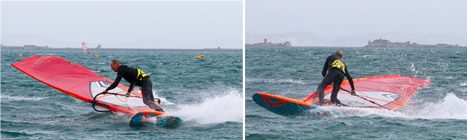
THE BIG PUSH
If you added in a wave, the 3 shot sequence below could be a lay-down backside top turn. That’s the one where you carve on your heels upwind towards the lip, then move from heels to toes at the same time dropping the rig down the slope (very scary with the wave about to break on top) but then thrust out the back hand to backwind the sail. You then use that pressure to drive the tail round. The end of the 360 is just the same except the consequences of failure are not so dire. So many lose it at the backwind stage because they just push the rig with both hands and stall it – it’s just the back hand.
The sail is behind you and has backwinded – now is the time to give it some welly. Sequence Tris Best
Believing the pressure will be there to support you, lean forward and thrust out the back hand …
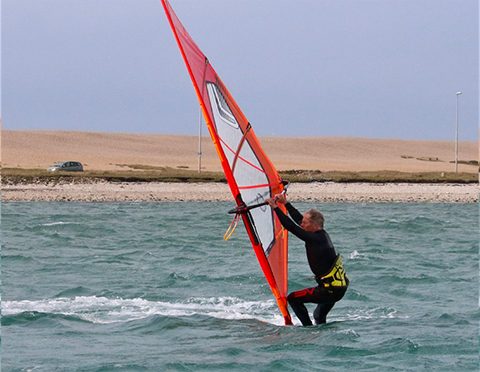
…and it will come back!
Front foot all the way
In a fast, dry 360, you’ll feel the back foot almost lifting out of the strap so little pressure will you have on it. You set the edge with the toes of the front foot and tighten the arc by increasing that pressure AND by leaning forward heavily onto the boom. It’s mastfoot pressure that engages and controls the front section of rail.
Lay down … a moment of calm.
If you’ve never dropped a rig into the turn before, you assume it will get blown into the water in an explosion of flesh and carbon. That really doesn’t happen. So long as you don’t slow down in a vain attempt to reduce impact. The way to ease into it is to obey that old gybing tip of pretending you have no UJ. The rig is fixed in the board so that when you bank the board over the rig goes with it. And from there just up the commitment levels. Far from being violent, laying the rig down is actually very calming. There is a moment of adrenalin as you lean over and pass the tipping point. However as the rig falls, it quickly loses power and all becomes delightfully calm.
Get on top
The most popular and comic way to mess up a 360 is lose commitment, stand up halfway round so that when the sail backwinds, you can’t resist it and get blasted backwards. So at the beginning think of rolling the front shoulder forward and bending slightly at the waist so you’re leaning right on top of the boom, pinning it down and in perfect shape to resist the rig when it fights back.
Sweep it back?
In the classic old 360, much was made about sweeping the rig back over the tail so that when it backwinds, it drives the tail round – and it does – but commonly people do it too early and too much to the point where they drop onto the back foot and kill the power and momentum. In the ‘in straps’ version, think less about sweeping the rig back and more about you overtaking it by projecting forward – head level with the mastfoot looking around the mast. Only sweep the rig back at the very last moment and not too far – because the further you sweep it back, the further you have to throw it forward at the end to bear away.
Backwinding and a dry finish
A key skill in backside wave riding and a host of new skool moves like the ‘shuvit’ is that of falling forward on the rig to aggressively backwind it. The difference between a scrappy and dynamic 360, is that in the former you
passively let the wind fill from the other side; and in the latter, you drop the back hand right back and really push. In a good one the act of backwinding not only finishes the move off and brings the rig upright again, but the clew drops in the water and acts like a hinge around which the board pivots.
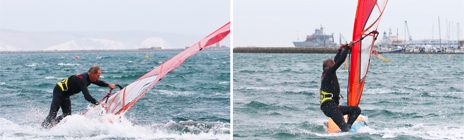
ONE HANDED HEAVEN
The one hander is impressive (and we love that), in many ways easier (we especially love that) and a great way to overcome the fear of leaning the rig into the turn. Up to full speed, slide the back hand forward to the back harness line’s head, bear away and release it. The rig drops so far and then stops and plays dead. The shock of it all makes many lean back and collapse, however, if you drop forward and keep carving, you’ll be amazed at the outcome.
The one hander – very cool and much easier than it looks. The rig drops automatically to the right angle, which is only a few inches above the water. PHOTO Brett Kenny
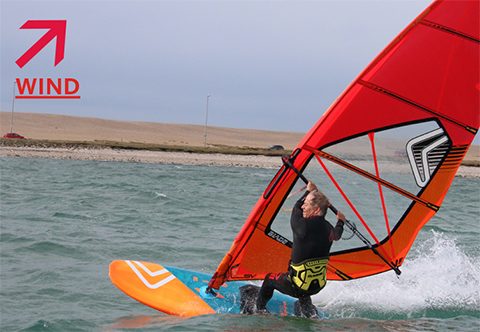
THE UPWIND 360
Technical requirements are a reasonably consistent helicopter tack in force 3 to 4 or at the very least some experience of sailing on the wrong side of the sail. The upwind 360 will force you to improve your backwinded control – but given a planing breeze and the length of the back-winded phase, this is not a good place to learn it from scratch. I love this move. It’s got a great feeling AND – unlike the down-winder that is often disproportionately
elusive – is readily achievable. Success is no doubt helped by the fact that you can nibble away at it in non-planing winds on a WindSUP or similar plank.
Take note of these tips and strategies.
Fat tails
This trick was born at the same time as the first freestyle boards – because it was more or less impossible on the long skinny ones of yesteryear. To stay balanced in the straps as you arrive head to wind, you need the support of a fat, wide tail – hence a big freestyle or freestyle wave board is the weapon of choice. If you want to make life as easy as possible, move the straps and the mastfoot forward. And as mentioned, choose a wind just strong enough to allow you to plane – but not much more.
Forward, forward, forward!
It’s the same message as for the downwinder. The challenge lies in controlling the nose from the straps as you arrive head to wind almost stationary. From the moment you initiate the carve into wind, you’re already projecting head, hips, shoulders, everything towards the nose so you can drive all your weight into the mastfoot and keep the board level during the backwinding phase.
Carve brutally
It’s like a small board tack – the more speed you carry into the wind, the higher the board will float and the more stable the transition. The longer you spend in the death zone (that area within 45° of the wind direction), the more speed you lose. The message is simple. Crank it into wind for all your worth while obeying the tip above – carve by hurling the hips forward and favouring the heel of the front foot.
Rig neutral
Old habits tell us to rake the rig back to go upwind. It’s not necessary. It takes less than a second to turn into wind and it’s all done with foot pressure. By keeping the rig neutral you don’t have so far to throw the rig forward when you backwind it.
Backwinding
This is what it’s all about. The first 50 attempts find you dying on the tail when you try to backwind the rig – usually due to too much back foot and trying to backwind too soon. Make sure you carve right up into wind. The backwinding action is to keep the rig closed (sheeted right in) and slice it forward into wind. And don’t just throw it a little forward – throw it WAY forward so the mast tip is a kilometre in front of the nose. Only when it’s forward do you backwind it with a gentle push on the back hand.
Bearing away
The moment the backwinded sail fills, start to push the nose off the wind, the sail will power up suddenly and with feeling. Your depowering reflex must be immediate and correct. To control it, drop the rig to windward with the front hand. Lift the clew right up (to sheet out). It helps now to move the back hand forward on the boom. Then as the board shoots off the wind, lower the rig even more and draw it back a little. You’ll be shocked and amazed how far to windward you have to lean it to control the power.
THE DOWNWIND SEQUENCE!
The choice of venue for the pics was the flat water haven of Portland Harbour – because on flat water the aging hipster can make the 360 look really good – loads of spray, a cheeky mid sequence smile – a picture of youthful dynamicism. So in blew a sou’easter, the one direction that throws up a wicked chop. That’ll teach me. But actually it’s in a choppy 360 that you really get to test your carving skills and balance at every stage of the arc – and realise how important it is to be balanced over that turning edge if you’re to stop it bouncing out. It also teaches you the limits of your board. In frames 2 and 3 of the sequence the edge is buried deep into the chop but still keeps on trucking. It’s a miracle of modern board design but you still have to keep the pressures even. Other things to note are how the arc starts wide but then quickly tightens up – and how the body position increases to the inside all the way round; how the head is forward and level with the mastfoot all the time – and how low the rig is to the water during the backwind phase.
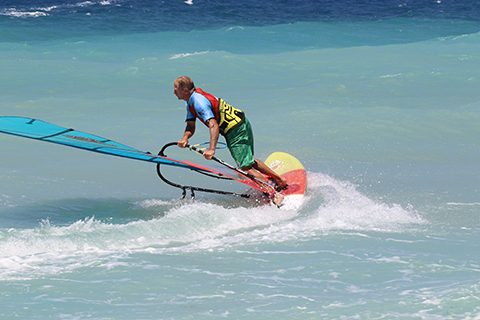
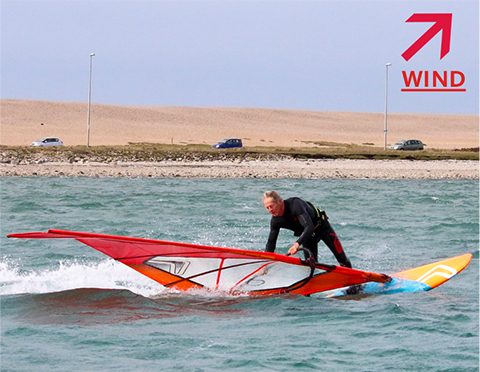
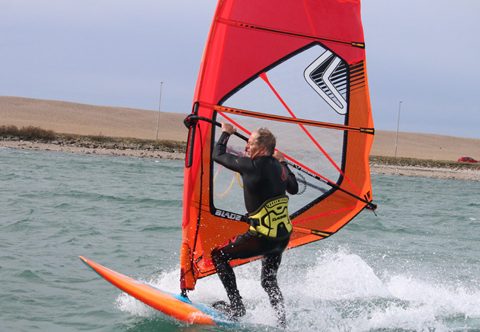
The entry is wide … but not too wide – it could be the start of a fast gybe. The rig is still upright and driving – but most important, all the weight is on the toes of the front foot and the board perfectly level nose to tail.
Sequence Tris Best
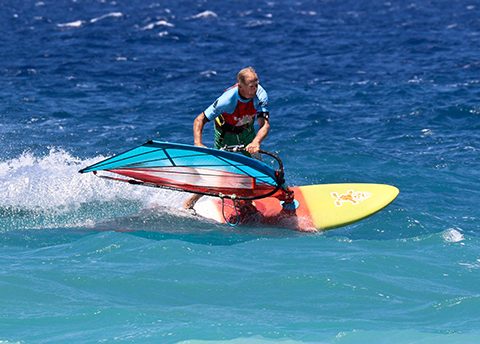
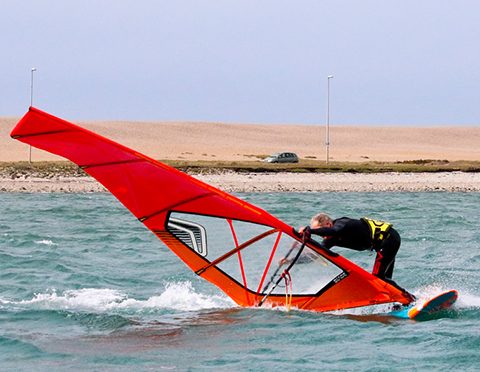
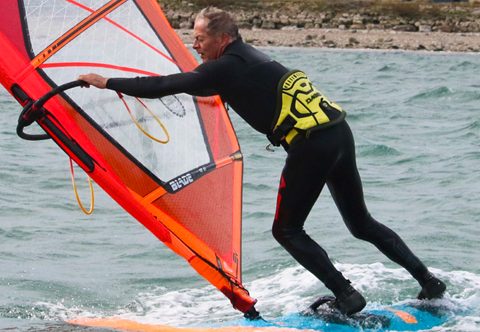
Broad reach and everything, head, body and rig extend forward and drop into the turn, the weight still firmly on the front foot. The rig is over-sheeted and the front hand drops it to the floor. There’s a real feeling of being on top of the boom.
It’s chop central, but the edge keeps pushing on through thanks to soft knees. The rig is still forward (not swept back). The loose leech reveals it is barely powered. It’s sailor weight through the boom that holds the nose down. If the nose were to lift now, it would be all over.
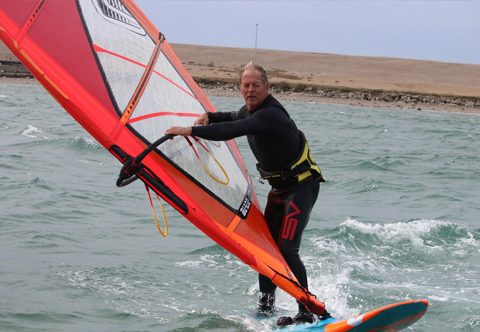
Nearing 210° and the rig is swept back a little, but still not backwinded. Check both knees are driving forward and the head position is over the mastfoot – forward forward forward!
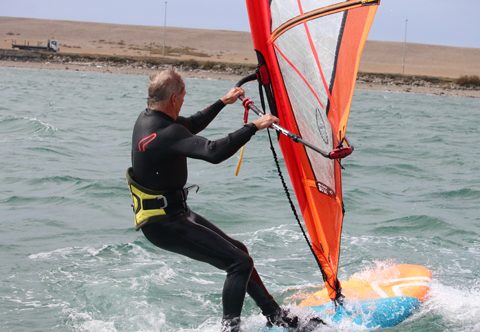
Nearly head to wind (270°) and the back hand pushes to backwind the sail and drive the tail round. And as the rig blows upright, in one movement …
… you hurl it forward, lunge onto the front foot, sheet in and bear away.
THE GLORIOUS FINISH
In the downwinder the first phase is the most exciting. In the upwinder, it’s the end. It’s like being thrown in a liquidiser (I imagine).
It’s all down to anticipation and preparing for a massive pressure change as the clew passes through the wind and sail fills from the original side.
The head rules. Keep looking over the front shoulder at where you are relative to the wind. As you turn to run with the ripples – i.e. dead downwind – bend the front arm to pull the rig upright, extend the back arm to push the clew through the wind – then at the same time throw the head to windward and rock back on the heels to resist the surge of power, which whizzes you around the last 90° in less than a nano second.
You’ll get pulled over onto your toes the first few goes – it’s easy to correct. I’ll give you a clue … lean back. If you keep over-rotating, get onto the front foot as the board spins and pull down on the front arm to lower the nose.
THE UPWIND 360
In the upwind version, we’re looking at many of the same elements as we did for the downwind version – controlling the nose by constantly favouring the front foot and driving hips and head forward, imagining the mastfoot is the front foot of your body and needs the most pressure. Head position is vital so you can keep an eye on the wind direction. And the fun, and tricky part, is reacting to the sudden change in pressure as you push the clew through the wind – it’s all about anticipation and looking towards the exit.
Carving in 100% on the front foot trying to project head and hips forward in anticipation of the lunge forward. Don’t drop the rig back too much. Sequence Tris Best
Head to wind, it’s time for the transition – this is the tricky bit. Keep the sail closed and slice it forward into wind. Press on the toes and push the knees towards the mastfoot.
Power the sail (backwinded) with a little back hand pressure … but be careful not to over-sheet or you’ll fly backwards. You’re right up on your toes, everything is powering forwards to hold that nose down. Note hand positions well back on the boom.
As soon as the rig pushes the nose off the wind, control the power by pulling the rig back a little, pushing it down to windward with the front hand and lifting the back hand to sheet out – the rig is a long way down. Prepare for the fun part …
It all happens very quickly. Look upwind over the front shoulder, rock back on the front heel, at the same time pull the front hand upright and into the shoulder and push the clew through the wind. As the wind smacks the original side of the sail, the power whips you round.
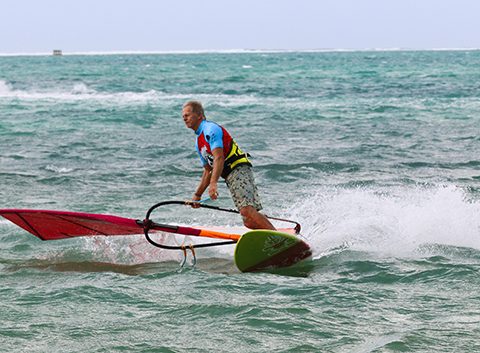
What the upwind 360 teaches you above all is to balance the board off the plane in the straps. PHOTO Brett Kenny
AND SO TO SUM UP…
There’s a lot going on with both moves. But sweeping away the detail, here are just 3 things to take away with you that will transform your approach to manoeuvres.
Big front strap. The more you open the front strap and the more you get the front foot across the centre line, the easier both moves become. Once you experience the feel of front foot carving, you’ll never turn back.
Forward!! All carving failure at intermediate level is down to NOT controlling the nose – i.e. not getting far enough forward and powering through the mastfoot. Both 360s are only possible if you project knees, hips, shoulders and head in front of the feet.
Thinking of the end. In all moves if you get bedazzled by what’s just in front of you, you’re reactive and therefore a step behind what’s going on. The 360s force you to start by thinking of the ending. Happy spinning!
In next month, in the first of a 2 part series, Harty goes foiling. If you’d like to see the 360s in video form with intimate analysis, check out his ‘Showing Off’ DVD, available along with many others (and clinic dates) on: www.peter-hart.com