JEM HALL
MOVE ON UP – WINDSURFING TECHNIQUE
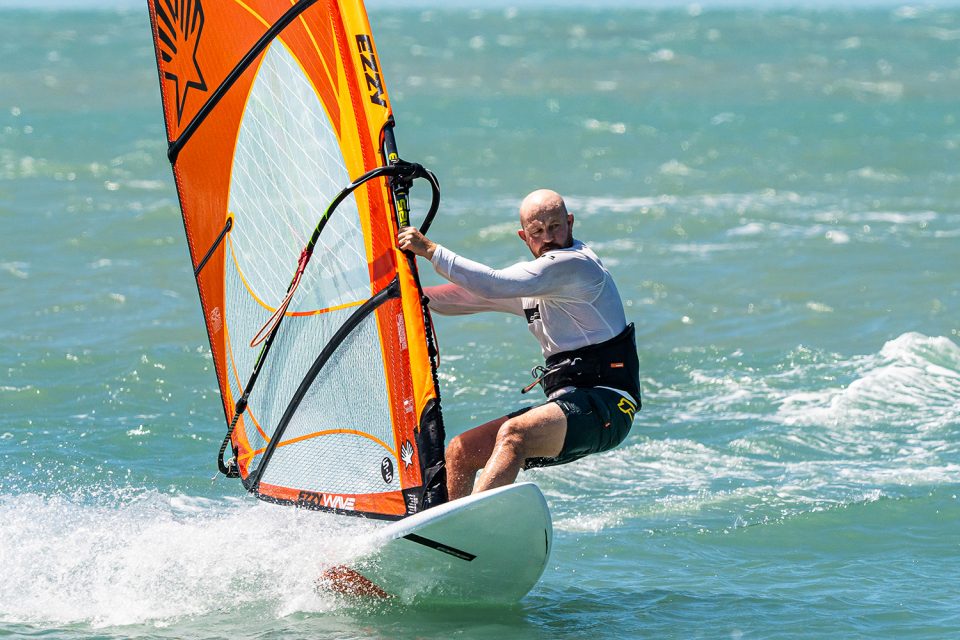
PLANING TACKS
MOVE ON UP – WITH JEM HALL: PLANING TACKS
Following on from the planing duck gybe tips from June, we examine how to unlock the polar opposite – the planing tack.
Photos: Eye Sea You Photo
Firstly, let’s discuss why you even need the planing tack to begin with because on paper it probably feels less important, and less fun, than learning to gybe. However, the planing tack will assist you greatly on your pathway to nailing a planing carve gybe, which will be the last feature in this series.
The skills you will build while learning planing tacks will massively help you to plane out of your gybes. Yet I hear you say, “planing out of a tack is impossible!”. In reality, we are looking to plane into the tack, rather than all the way through it, by carving smoothly towards the wind, but once we are at the exit we are looking to get back on the plane as quickly as possible.
For simplicity I will breakdown the planing tack into a who, what, why, where, when and how format:
-
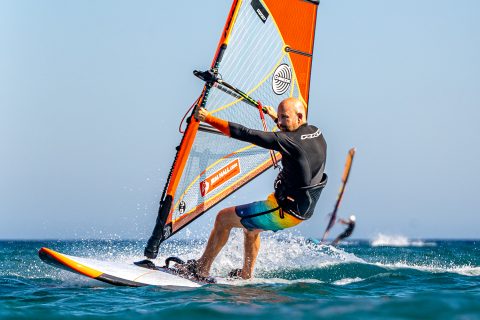
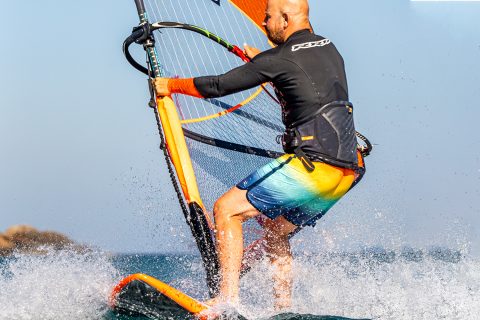
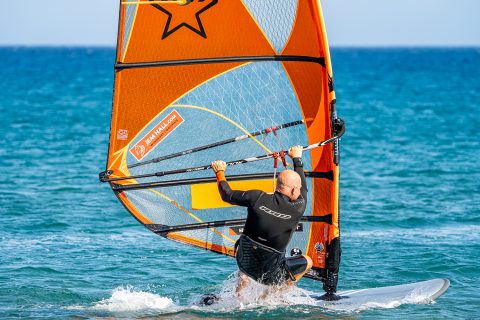
- Look forward whilst planing in the straps, across the wind, place hand on mast, in readiness to unhook. Pull down on mast hand, and weight front foot to keep the board flat.
-
- Unhook, by bending elbows and staying outboard. Get feet out of the footstraps, back foot first. Pulling down on your arms really makes this smoother. Place your back foot next to front straps.
-
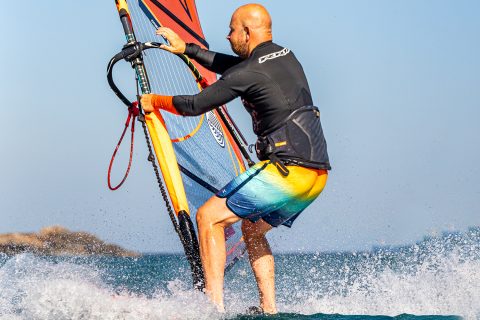
- Now take front foot from the strap to in front of mastfoot, pulling down on the mast maintains your speed. Carve towards the wind (looking forward), on your heels, raking the rig back and moving your hips forwards and out (more than I am here).
-
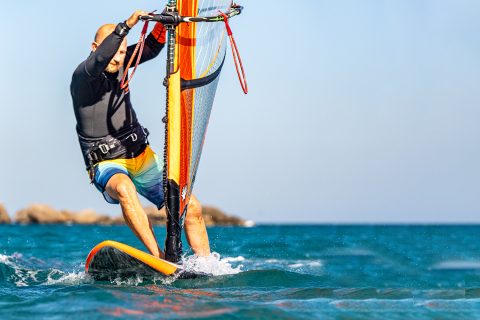
- Before head to wind be ready to make the change. Go for an extra hip swing forwards, and out. Wrapping the front foot more around the mast foot helps this. These actions lighten your back foot so it can move. Keep your mast arm straight!
-
- Now you can look to the new side of the boom in readiness to place your hand on it. The hand moves just before the foot change, this will help you throw the rig forwards fast and early after your foot change.
-
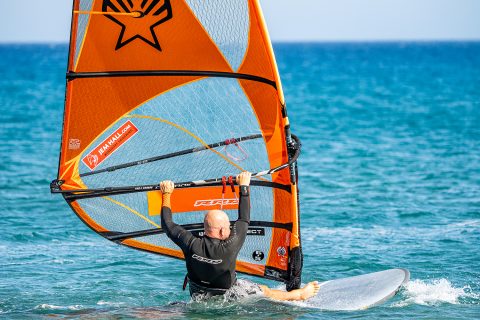
- Precision; with the hands it is about having your backhand by the back line on the entrance and your front hand low on the mast. Having your front foot forward and on the mastfoot helps your footwork, and helps prevent the nose sinking, which will then help you get your back foot back past the rear footstrap.
In your ‘drop and push’ position, whilst pulling down on the boom, and flexing the back leg, you are in a great position to slip your front foot into the strap. Slipping your backhand back up the boom to the back line will get the rig more upright to help you get planing. With good power you can then get planing, or you might have to hook in and lazy pump to get up to speed. BELIEVE and go nail it!
WHO?
This move is for anyone who is already pulling off a few tacks, but also looking to take their tacking game to the next level, primarily by entering tacks with more speed! Ideally, you are also progressing, or already competent, at getting planing from the footstraps. As opposed the old school way of planing in the harness and then getting into the straps. The better you are at quickly planing out of a tack, the quicker you will be at cracking the planing carve gybe… ah, now I properly have your attention!
You can get more info on the basics of the tack in a previous piece from July ’23, and my light wind transitions piece. You should also recap from the June ’21, “Tack Attack,” which will give you a great overview on the move.
WHAT?
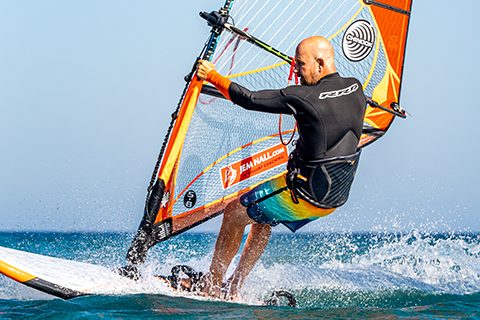
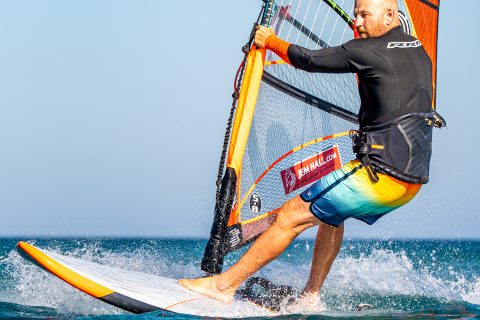
The planing tack is an upwind transition, during which you unhook and crucially aim to keep your speed upon entry, (think about gybes here), before carving smoothly towards the wind and then moving your feet as quickly as possible so that you can get your foot back into the opposite front strap as quickly possible, and more importantly pop back on to the plane!
One of the main tips when exiting your tacks is to get low and scissor the board as hard as possible in order to steer the board downwind quickly, while catching the wind on the opposite tack. When executed correctly, this will lead you to being in an excellent low, committed and outboard position, which is a highly efficient position to get planing from. From here, the exit is diametrically opposed to standing up, hooking in and being a bit passive.
WHY?
Many people ask me, mainly old school sailors, why they/we should tack in the first place? Well, it keeps us upwind, helps us to gybe better on the opposite tack and it gives us more jumping and wave riding opportunities when wave sailing. Plus lastly when the wind is cranking, it is far less scary.
The planing tack is a notch up, and it should be strived for by any aspiring sailor as it will make you more active and efficient. Furthermore, it will help you improve your unhooked prep and carving (crucial for planing gybes), while it has great crossover into the waves.
WHERE?
There are lots of options again here; the easiest is on flatwater as you have both the time, and the space, to get up to speed and complete the move without having to think about anything else.
It is also great to tack in between waves as the space between them is often very flat. Depending on the swell, there may be less space between the waves, which is when the tack really comes into its own as gybes need more space and time to perform. Furthermore, you can do it near the top of a big swell and then you can use the power of the next wave, plus gravity, to help you get planing again.
The coup de grâce of planing tacks is to do it onto a wave, then bear away and go straight into the straps without hooking in. You can then decide whether to ride immediately or wait and cherry pick a better wave behind you. Essentially, it puts you in a powerful position.
-
- ‘With your feet wide apart, and body low and out you are not only in a great position to steer out of the tack, but also well placed to stay down there and go into the front strap to get planing!’
WHEN?
Learning the move is often best when you have good wind and speed as you maintain momentum after unhooking and then have a stable board to carve upwind on. In order to plane away, you need a decent amount of power to get you planing once you have steered out and then moved into the front strap.
Using a wave / swell is an opportune moment to plane out of a tack as you benefit from the power of not only the wave, but also gravity. In terms of your prep and footwork, it is crucial that you unhook across the wind and then carve and move your feet before you head directly into wind. If in doubt, go round the front early and then be active in your exit.
HOW?
I will now share with you my main tips for planing tacks and break the move down into bite-sized chunks in the sequence enclosed.
MAIN TIPS – PLANING TACKS
- Preparation; follow the H.U.F. principle in order to maintain speed and be ready for the footwork into the exit. This is Hand low on mast (or front of the boom), Unhook (by ONLY bending your elbows), and then Feet out of the footstraps.
- Vision; looking forwards into the tack will help your timing and weight placement. Look at the boom to get your new front hand to the other side and then looking forwards fast towards your exit will really boost your tacks and it is one of the key actions to focus on.
- The hips don’t lie – Shakira, Shakira – got your attention again didn’t it… going into the tack is all about getting the rig back and your hips forward and also OUTBOARD. Coming out your aim is to get the rig forwards and your hips back, and out, so you can scissor the board and then get planing again, hoorah.
- Precision; with the hands it is about having your backhand by the back line on the entrance and your front hand low on the mast. Having your front foot forward and on the mastfoot helps your footwork, and helps prevent the nose sinking, which will then help you get your back foot back past the rear footstrap.
- Getting down James Brown; being low and out really helps all phases of the tack, from unhooking, to carving, to the exit.
- Slippery hands; this is all about relaxing your grip on the boom, so it can slip through your grasp and help you move your hand to a better position on the boom. None more so than when you grab the boom on the new side, look forward fast and send the rig forward. You will grab it at the front, but when you ‘send it’, then the grip is relaxed so the front hand ends up at the front line. Now it is best placed to not only steer, but also assist in getting planing faster.
- Planing; your planing technique will really be called into action when looking to plane out of this and other moves. Refresh yourselves with my tips from my August ’22 piece. The main actions after a tack are; keep the rig away, get the rig forwards and upright, pull down (not in!) on the boom, front hand near the front harness line and look upwind to see the wind, so you can adjust your sailing line accordingly.
-

- ‘Look to see your hand move to the new side and then you can tack even better in the tight spaces between onshore waves.”
KIT
– Turny boards that plane easily, like a medium to small freemove, or a fast medium to large FSW.
– Sails from 6.0m and below are easier to tack. A 6.5m will work, but is pushing it as the biggest I would recommend.
– Not too big a fin so it is easy to control on the entrance and carves smoothly towards the wind.
– Generous footstraps; will ensure your feet can get out of the footstraps smoothly and are easier to get back into for the planing exit.
– Long lines; these enable unhooking from a low position so you can keep speed, before carving. They will also help you get the rig more upright when you hook in as you consolidate your planing exit.
Ezzy sails, RRD (boards, wetsuits & softwear), Chinook & Black Project fins sponsor Jem Hall. Get him live and direct on one of his highly acclaimed coaching holidays – check out his website www.jemhall.com for details. You can also follow him on X / Facebook / Instagram.