JEM HALL
MOVE ON UP – WINDSURFING TECHNIQUE
SMOOTHER GYBES
Smooth carve gybing is a huge challenge for a lot of sailors and a move many of us aspire to do and do well. I still love gybing and want every one to feel great and ideally come out planing. It is a simple move but not easy. The best approach for smoother gybes is to address it in stages and get into key positions (with their associated skill sets) in order to ‘finish the mission.’
Words Jem Hall // Photos Nicolas Jones, Kevin Pritchard
www.jemhall.com
(This feature originally appeared in the June 2018 issue of Windsurf Magazine. To read more features like this first, Print and Digital subscriptions are available.
Prices include delivery globally for 10 x issues a year!)
I have previously identified gybing skills and drills to practice in my April 2018 piece. That feature focussed a lot on the preparation phase, whereas this feature is more about the middle and briefly, the exit / end game. If you follow my guidance, are fit and dynamic, self coach and believe, then together we will nail your gybes.
Preparation is the key
I will summarise the main points of the preparation phase again:
• Back hand way down the boom. Crucial! Do it here and it will be the norm for wave rides and other power moves.
• Front hand back on the boom. This helps the back hand get further back amongst many of its benefits.
• Get down James Brown. This commits you to the sail’s power, keeps speed and facilitates easy unhooking and faster exits too.
• Unhook by bending your elbows from your low position. Do this and we upset the board less.
• Always hang off the boom and keep pulling down on it when unhooked. This keeps the board flat and you away from the rig.
• Back foot back and on the rail. The back foot can come out pre bear away (or during), but it must be back and next to the back strap. Carve gybes require both precision and power!
• Scissor/steer a flat board into the gybe. Turn the board downwind (bear away) by leg steering / scissoring. Only carve when you are stable and the sail has lightened.
Fail to prepare effectively and efficiently and you are preparing to fail.
It’s all a phase
I will now look to identify what I have found through thousands of hours coaching and free sailing, what are the key phases (stages) that we need to be aware of and look to improve and add quality too.
The Roll
This occurs when you go from locking down the rig and steering the board downwind to moving up and then over into a carving position. It is a transition phase from resisting power to yielding to it and going with it. Many windies are so used to fighting the rig that going with it feels counter intuitive but ‘you got to roll with it!’ Pull in on the backhand subtly, shift some weight to your front foot and aim to create, in effect, a mini catapult. Let the rig pull you up and then over into the carve. Your front leg should be relatively straight and then as you go forward you should really bend your front knee and ankle, whilst keeping your heel down. Lean against a wall with a straight back and then roll forward and bend to get the sensation. If you are doing it right, the board will feel very responsive to carving pressure and the sail should still be light and you should aim to see the water in front of you. This is what we call a front foot gybe, i.e. entering the carve on the front foot. If you cannot see the water in front of you then you are either looking at the sail or entering off the back foot and being defensive. As well as ‘rolling with it’, you should aim to ‘show the sail’ to the water. A mantra I use is ‘show the sail and feel the rail.’ My top top tip here is to go into 10-15 gybes and only aim to get this roll or sensation going on, nothing else matters! Please note the sail is pulled in with the back hand, but not excessively so until you’re better at gybing and going into them at full tilt.
Show and go
A point worth making here is that your gybes are best done with a wider arc, as width gives you time and also means you are taking time in the ‘Prep’ phase. However, we are not dwelling too long in this ‘showing the sail’ position. In effect we are looking to ‘show and go.’ This means we roll into the carve and apply pressure through our feet to carve, mainly front foot at the start and then more back foot pressure. After our ‘show’ we must look to ‘go’ into the next phase which is actually the mid-point of our gybe. In a less powered gybe I still show the sail but only slightly. As I am likely to lose speed I will then ‘go’ into the mid-point and swing the sail up and open with my body following with the required movements and counter balancing skills.
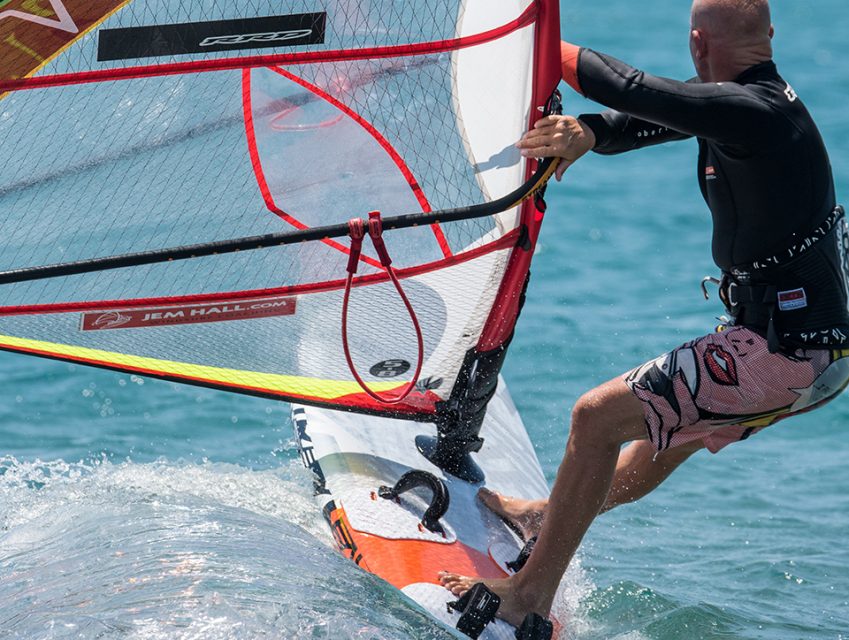
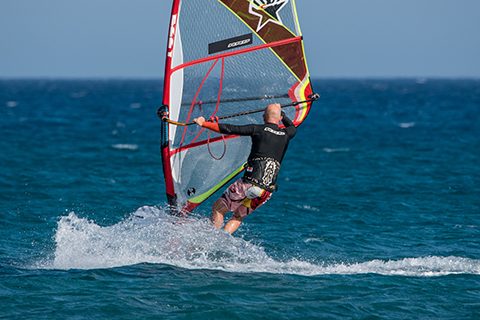
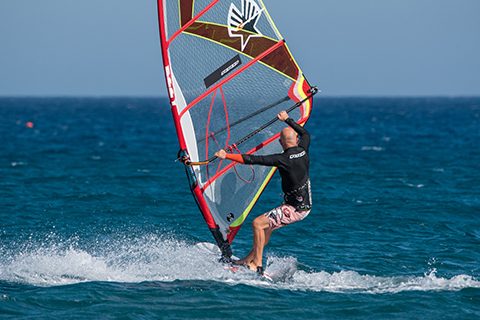
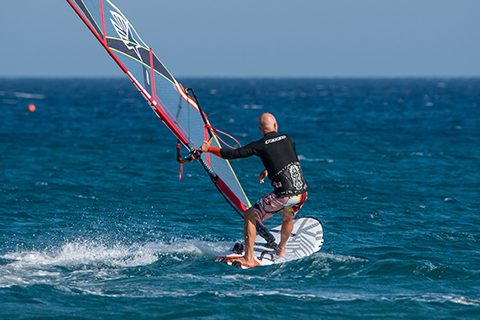
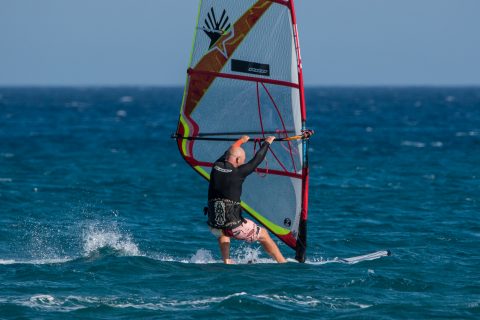
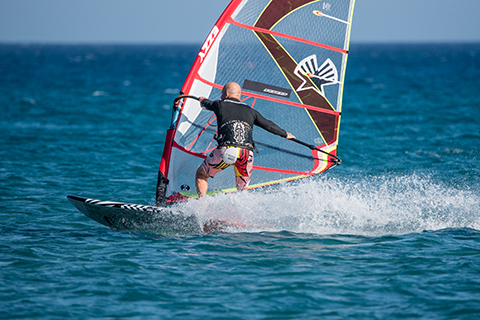
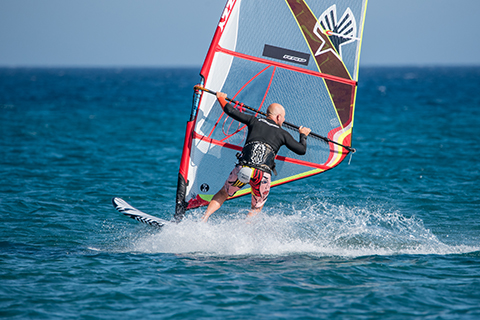
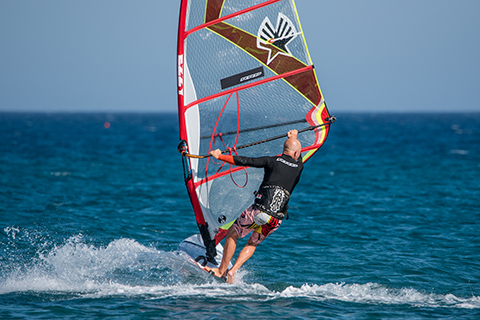
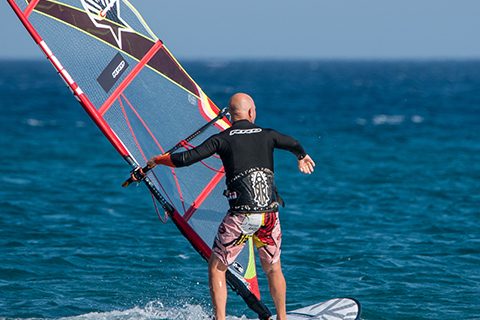
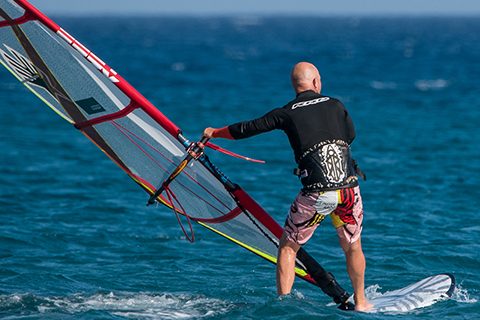
Powered up gybe with planing exit.
1. Just after showing the sail I am already shifting across from front to back foot carving, yet my rig is away and board still flat. A good indicator is a smooth wake line. ‘Show and go.’
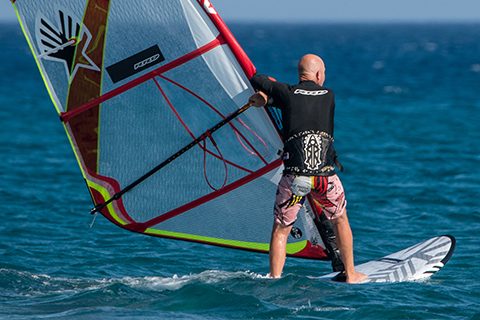
2. Here you can see how far my hands are down the boom and how my rig is moving to the outside of the gybe as my hips shift to the inside to facilitate a slick foot change – ‘the swing.’
3. I have completed the foot change and am taking ‘contact’ (power) from the rig while clew first. Note my hips are back and the rig is up and forward and I’m carving on the heel of my back foot.
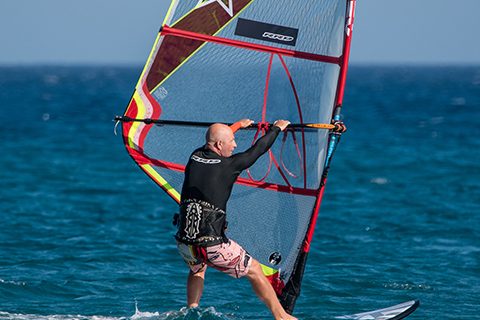
4. Now it’s time to ‘finish the mission’ after my foot change so I have to slide my front hand right up to the mast so I can swing the rig back and rotate it as I look forward and keep carving off my heels. Check how my front foot is facing forwards up the board.
5. I have reached under and collected the rig overhand and driven it forward and am taking the power and using both this and pulling down to flatten the board and get speed. My legs are pushing the board to the optimal planing line for the power available.
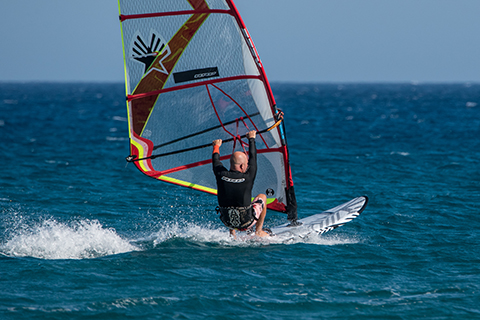
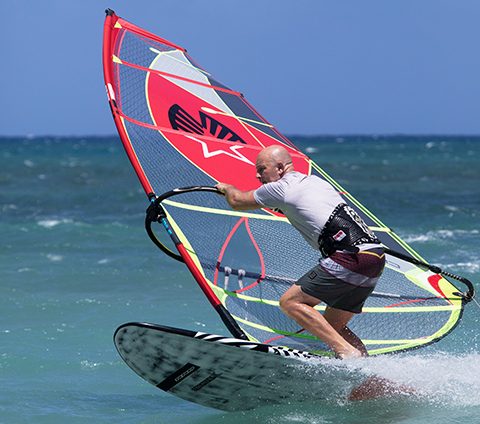
6. Pulling down on the boom and bending the back leg will give me a fast, safe exit and I enter the front strap BEFORE hooking in!
If you want a reference point for this mid-point in the gybe, then the board should be cutting through the chop perpendicularly and our vision will have shifted from seeing the water to seeing the clew. When well powered I am showing the sail for longer and will more gradually shift my carving pressure from front foot to back foot as I open the sail, or as I say, ‘open the door to my exit.’
The swing
Opening up the sail mid gybe, and during a wave ride, can be likened to the missing link in these moves. How many people have you seen fly into the gybe and over sheet and then either fall onto the sail, have the sail get ripped open in the exit phase or just lose heaps of speed. This is because they have not opened up the sail by swinging it open and shifting / swinging their hips across and into the carve. With your back hand down the boom your front hand is the hinge and you then have massive leverage to open the sail and also lean it to the outside of the turn so you can shift your hips to the inside to up the carving back foot pressure ready for your foot switch. This phase is dynamic and should also be aggressive and positive.
After you have swung your hips across you can see the clew and then do your foot change. This will be covered at more length in the future, so for now focus on weighting the back foot (toes on rail) to allow the front foot to come out and the heel of this foot touching (kissing) the back foot’s toes and then you can step forward with the back (new front) foot but keep your hips back in readiness for the ‘contact.’ This whole foot change / exit phase becomes a lot smoother, more consistent and effective when you ‘own clew first’ sailing and are the master of the light wind gybe as per my previous directions!
The contact
This is yet another vitally important phase and skill that will have you finishing more gybes and what’s more, finishing them in style. It will also give you more choices of how to end your gybe and ‘finish the mission’. Once you have done your foot change and begin to move the new front foot forward and are moving towards the exit phase, it is paramount that you look to take some ‘contact’ clew first. This means resist the power of the rig and take some power from it. This might be for a split second or a few seconds, and it will require you to be low, hips back and arms extended, pulling down on the clew hand and trimming the sail with the mast hand.
If you really WANT to nail your gybes you will aim to plane clew first at this stage and not even think about ending the gybe. Focussing on one phase at a time will give you the best gybes in the long term! Why do we do this phase? It gives us stability, gets us committed, keeps momentum / speed and buys us time to slide our front hand towards the mast for a slick rig rotation. Own clew first and you will own windsurfing and own the carve gybe.
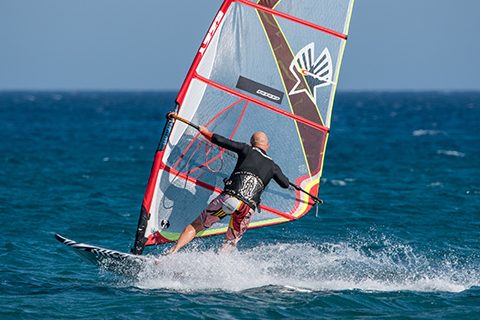
Less powered gybe with non planing exit
1. This demonstrates the ‘show’ of the sail and how I can see the water whilst carving with bent ankles.
2. I have shifted my vision from seeing the water to seeing the clew so my hips will then follow across ready for the ‘swing.’ I am nearing the middle of the carve (dead downwind) and have already sensed less power and speed.
3. My hip swing gets me across not only for the foot change but also to be in a position ready for the clew first ‘contact.’ You can see my feet switching close together, yet my new back foot (heel) should be on the rail, come on Coach!
4. As I was less powered up I would have got in a stable clew first ‘contact’ position briefly to give me time to slide my front hand towards the mast and crucially ensure I am heading off the wind but towards the new direction. I am looking forwards to help me assess my positioning and keep me outboard.
5. I swing the rig back to steer the board onto the new tack and am subtly steering through my feet whilst my old back hand gets ready to reach under my old front hand. My hips will be swinging relatively forwards and out to counterbalance the rig’s movement. Check how I have stepped further forwards to flatten the board.
6. I trust my hands to find the new side of the boom with an overhand grip so that I can power up the rig efficiently and even waterstart if I fall in backwards. My new front hand will send the rig forwards as I begin to move down, back and remain outboards.
7. I have got the rig forwards and have the board flat. I will now see if I can spot some wind to plane off, or I will ‘chug’ upwind to await the next gust. Note the key exit stance – look forward, hands together near the lines, arms extended, body out and getting down, front leg extended and back leg bent, front foot facing forward.
Kit:
Generous sized straps to allow you to carve and have a smooth entry and exit from them for foot changes.
Long lines enable you to sail fast over bumpy water and with your front hand back, which aids getting rig forwards and across in the gybe.
Well rigged sail that has control and will breathe for you and work with you.
A modern thinner railed board and a fin that are both not too big as this makes carving easier.
Finish the mission
This is often what my clients hear me shouting either when I am filming them carve gybe or about to finish a wave ride. This is the exit / end game phase, after our clew first ‘contact,’ and addresses rotating the rig and then taking power from the rig and looking to maintain momentum and eventually find the holy grail by planing out of our gybes. I will provide some quick tips here as this, and the ‘contact’ phase, is really an article in itself:
• Get down James Brown and take power clew first, looking forward.
• Pull down on the clew / back hand and slide mast / front hand from the harness line to the front of the boom next to the mast.
• Release back hand and send rig back (towards tail) as your body remains outboard and actually shifts forward to counterbalance this movement.
• Reach under with old back hand and grab the new side of boom with an OVERHAND grip (best early planing grip!).
• Carve off heels throughout the rig rotation to keep board turning from off the wind to across the wind.
• Get the rig forward and keep outboards and low and pull down hard on the boom.
• Push the board downwind to assist acceleration and then get into the front strap before hooking in.
Look forward, see the water, bend that ankle and show the sail.
PHOTO Kevin Pritchar
RRD boards, wetsuits & softwear, Ezzy Sails & Black Project fins sponsor Jem Hall. Get him live and direct on one of his highly acclaimed coaching holidays but be quick as they are selling out – check out his fab new site www.jemhall.com for details. You can also follow him on twitter / Facebook / Instagram.
www.jemhall.com