PETER HART PLANING GYBES THE SECRETS UNLOCKED
Planing out of a carve gybe is solid evidence of polished technique. Never planing out despite thousands of attempts, by definition therefore, proves that virulent bugs have infected the system. In a piece that will surely talk to the vast majority of windies out there, Peter Hart, looks at every stage of the arc, identifies the common peccadillos and tells you what to alter in order to nail that speedy exit.
Story Peter Hart // Photos Simon Bassett/2XS
How would you describe not planing out of a carve gybe despite weeks, months, years of trying? Here’s a selection of the few printable analogies dreamed up by friends on a course. They express both humour and frustration … but more of the latter. “It’s like trying to master the Rubix cube – as soon as you get one bit right, another falls out of place.” “It’s like walking 100 miles across a scorching desert only to collapse 3 feet from a pub selling ice cold lager.”
“It’s like taking a girl out on a series of dates to the most expensive restaurants only to be rewarded with a peck on the cheek – very little interest from investment.” If you can get round a good number of your gybes, surely, with practice, the Holy Grail of the planing exit will organically evolve? And then, when you’ve done one, will not rows of light bulbs illuminate and the mystery be solved? Apparently not. Doing a planing gybe is less like riding a bike for the first time (once achieved forever remembered), and more like the golf swing. Through perseverance (monkeys and typewriters) you may indeed connect sporadically with power and accuracy only for the next shot to dribble 6 inches in an explosion of mud, turf and profanities. But for it to be repeatable, many basics have to be solid – the grip, the stance, the back lift and … that I’m afraid is where my golfing knowledge runs out.
Likewise with the gybe, happy circumstances – a fortuitous gust, a downslope – may combine to propel you occasionally to a rapid exit; but you weren’t aware of doing anything differently and, like a will-o’-the-wisp, that magical moment evaporates. And there’s a deeper problem. The measures you discovered to help you survive those first gybes are the very ones that all but eliminate the chance of a speedy finish. For example:
> washing off speed on entry so it feels safer.
> dropping back against the rig so all the way round you feel a reassuring counterbalance.
> coming out clew first for the same reason.
> delaying the rig and foot change because surely you have more chance of staying in balance with the board stationary and stable?
They’re all defensive instincts, which in windsurfing terms inevitably involve resisting the power source rather than going with it – and sailing off the tail rather than the middle of the board. The bad news, therefore, is that to achieve the planing exit often demands a complete rebuild. But the good news for those who are nearly there is that the difference may just be a technical tweak – a shift of the hand, a drop of the heel, a turn of the head. So coming up is not a complete lesson in how to gybe. Instead I’m going to select elements from each stage of the gybe that specifically influence the chances of planing out. But lets set the scene with some generalities.
KIT AND CONDITIONS
Fear lies at the heart of most mistakes. Flat, shallow water you can beachstart away from after a fall and a stable, solid-but-not-over-powering wind, will free the mind and help you attack with greater speed, drop your body in the void and commit in directions and to an extent you haven’t before. Seek out that glorious 18-25 knot wind window (force 5-6). Much less than that and the planing gybe becomes very technical. You have little reserve power and are being pulled along by a thread, which is all too easy to break. You overtake the wind as you bear away, at which point the sail depowers. With little backhand pressure the big rig swings round ponderously. The longer the board remains unpowered, the more time it has to slow down. A planing exit is possible, but there’s no room for timing and trim errors.
And with much more than 25 knots, you start to have control issues. The wind is strong enough to destabilise the board and, in all but a few special places, kick up a vicious chop. You’ll have to depower the rig with a committed over-sheet, which is advanced stuff. And that feeling of full-on power can encourage that succession of defensive reactions listed above. The right sail choice is the one that allows you to sail 120º downwind powered up. Many people play safe with sail size to the extent where they can only plane across or just off the wind and slow down as soon as they bear away. For a planing gybe you have to get that feeling of being shot out of a gun as you foot off.
And the best conditions? A cross onshore 20-knot breeze and a clean, well-spaced lazy swell. Bear away onto the swell so you’re doing the rig and foot change (where most mess up) going downhill – but that’s cheating.
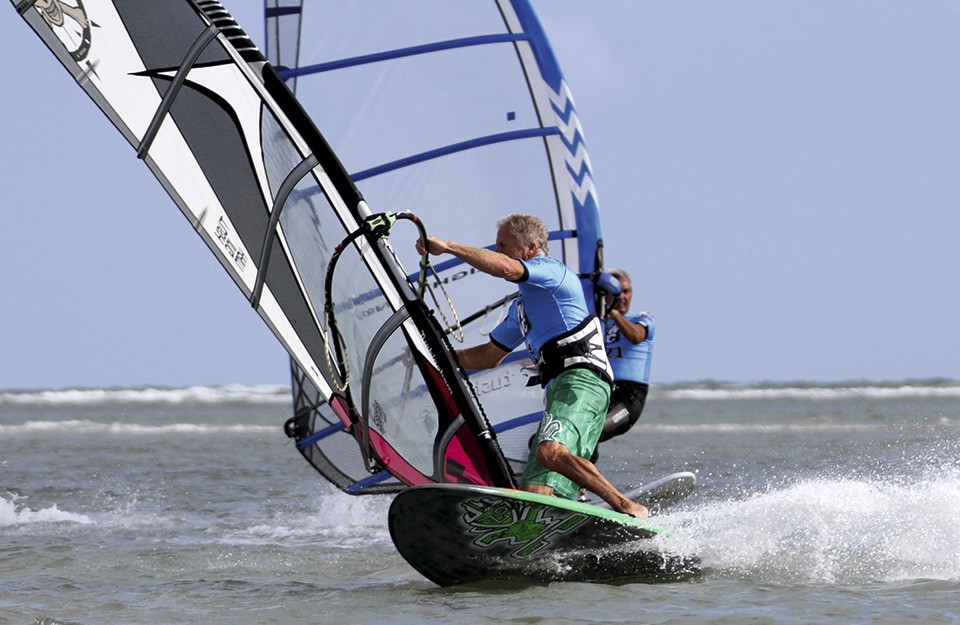
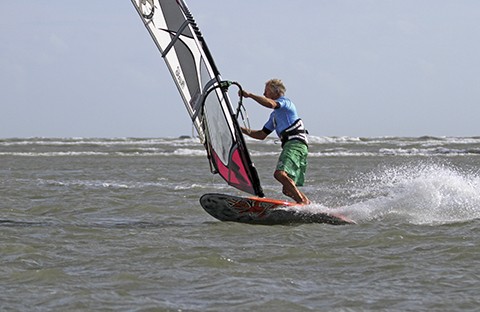
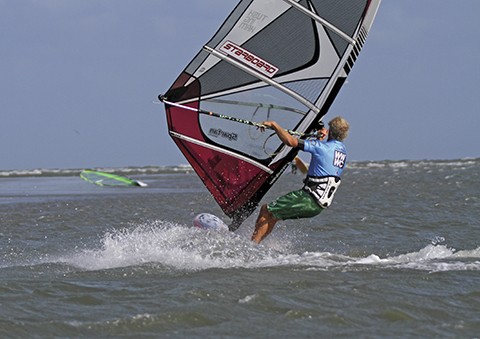
Stage One – the set-up
In terms of planing out, this is the most important frame of all – the preparation phase. Say you started with 25 knots of speed when you were hooked in and hooning, you want every one of those knots now that you’re unhooked and ready to pounce. This is where most lose speed and stability. Disturbing the rig as they unhook. Sheeting out as they move the back foot out of the strap. Forgetting to move the back hand back. Doing all this after bearing away when the board is accelerating and especially sensitive to movement. It is SO much easier and safer if you prepare across the wind where you can hang off the boom and move feet etc. without upsetting the trim. The main points here are anticipation and body position. You’re like a 100-m. runner straining in the blocks, body in front of the feet ready to explode forward. You’ve born away a few degrees off the wind just enough for the sail to power up and pull you forward. So important now is to project forwards by softening the front knee and moving the head and hips almost level with the mastfoot. And where is your back foot? Don’t put it too near the inside edge or the toes will drag in the water and slow you down.
Top planing point.Take a couple of moments to let the board settle and make sure you are strong, stable and balanced. Taking the back foot out is NOT the trigger to give the rail a hoof.
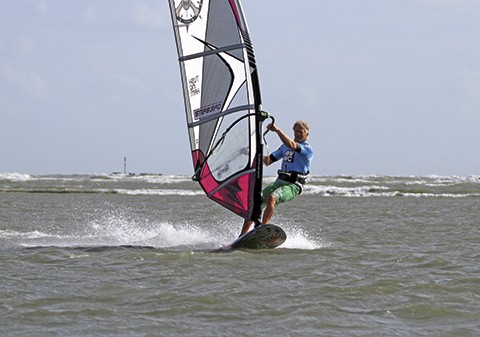
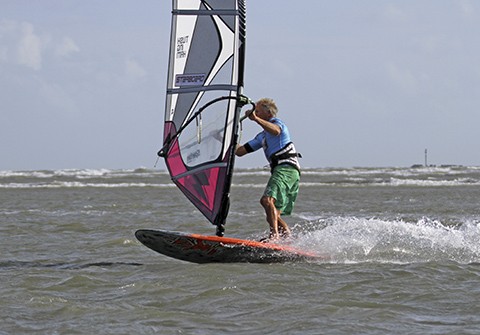
Stage two – initiation and triggers
So what initiates the carve? Clue: it’s not the back foot. This requires a major change for most people. You want the board to stay level nose to tail. You want the front section of rail to grip. You do that by rolling the front shoulder onto the boom, extending the front arm and dropping the rig forward and to the inside – at the same time holding the tension with the back arm (don’t sheet out!). That powers up the sail, loads up the mastfoot, drops the nose and ‘lays the rail.’ And how much pressure do you have on the back foot at this stage? Virtually none. Loading up the back foot too early and lifting the nose is death to the planing gybe.
Top planing point. By dropping the rig to the inside you create space for you to move into, you reveal the path ahead and can see where you’re about to gybe. If the rig is always blocking your view, you’re bound to be defensive and drop back.
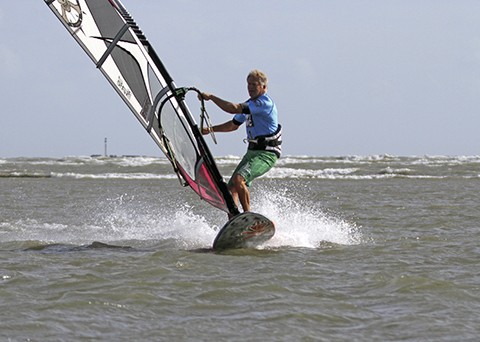
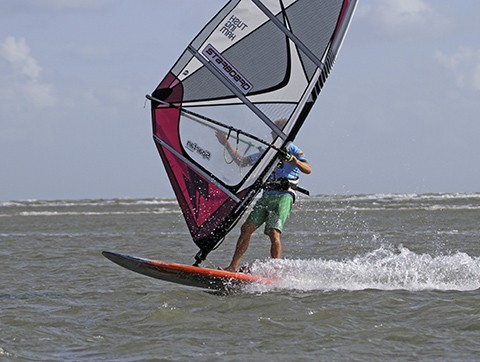
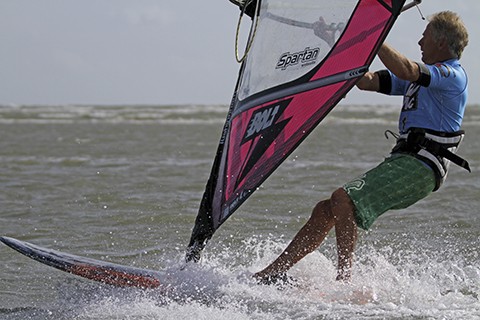
Stage 3 – commit and drive
Every speedy manoeuvre has a moment where you just have to man up and drop your body into the void. This one such moment. As you drop the front hand and twist the rig, the sail wants to pull you over the centreline to the inside. Every instinct is to resist that pull and sit back – and there ends the chance of planing. You have to go with that pull. Yes there is a sensation of being catapulted – embrace it. But here’s the key bit – as your hips overtake your feet and make themselves the centre of the circle, that’s when you can drive off the back foot to steepen the carve. But with your body forward – and in – you’re not stamping on the tail, you’re driving the rail out behind you – it’s weight forward, pressure back and suddenly the board catches up with you.
Top planing point. Check the direction of the knees. They should be pointing at the centre of the circle. If they’re pointing at the mastfoot, you’ve sheeted out and will be centred over a flat board.
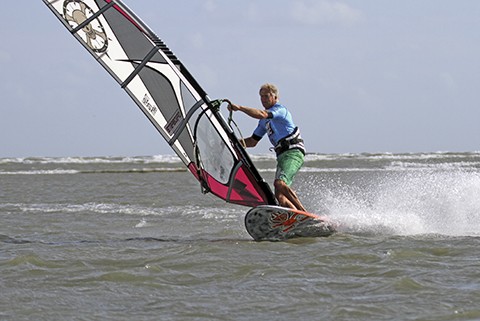
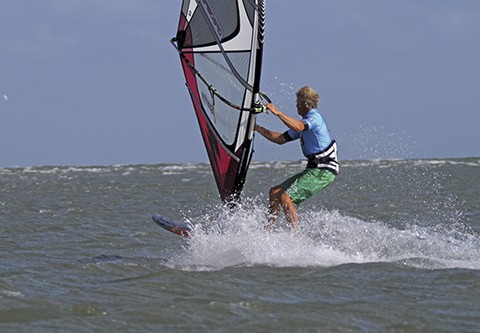
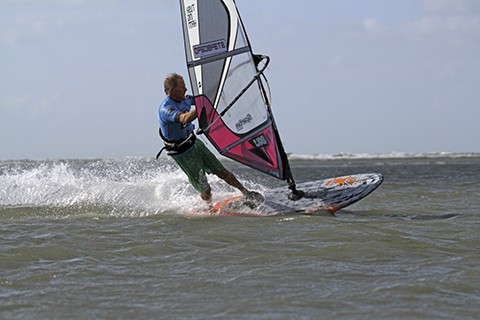
Stage 4 – preparing to change
Dead downwind, the gybe is less than 2 seconds old but already you’re into the transition as the backhand starts to open out. Downwind is where so many stand up and level out. No! This where you must be most committed, increase the rail pressure, tighten the carve, go yet deeper in the knees and increase your position to the inside. See how much rail is still engaged. If you’re analysing your performance from a photo, examine 2 things at this stage. What’s the angle of the mast? If it’s upright or, worse still, leaning back, you’re gybing off the tail and are soon to grind to a halt. Tilted way forward is the right answer. And look at the spray. There should be an even spray coming off the whole rail, not just a rooster tail.
Top planing point. As you accelerate downwind and the pressure drops, throw the front hand even further forward to maximise the power and create yet more space for you to step forward into.
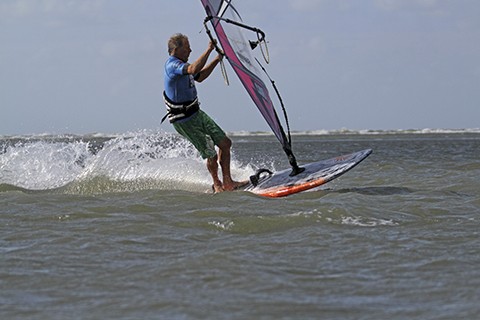
Stage 5 – getting turned
If we just watch the board it should show no signs of anything going on. Try to move the feet without making an elephantine weight transfer. We have close ups of that coming up, but the trick is to hold your position to the inside so your weight acts dynamically. If you open the rig and let it turn your shoulders, your feet will want to follow and drop into the right positions. If the front foot doesn’t want to twist out of its strap, then you’re guilty of standing on it and letting the hips drift back over the centre-line.
Top planing point. The hips should already be in the right position to sail away on the new tack – all you have to do is rotate your feet beneath them.
Stage 6 – the full-speed foot change.
With the gybe just 3 seconds old, the feet have switched with the board only just through the wind as it’s hitting top speed. If you do nothing else but switch the feet earlier, you will smell the sweet scent of a swift exit. And check the body position – moving forward on the board, not looking for the rig for support.
Top planing point. Switch early!
REALISTIC EXPECTATIONS
Someone says to me “I need help. I don’t plane out of all my gybes.” Well nor do I –mostly through choice (well that’s my excuse). The right situation doesn’t always present itself. Nor is a planing gybe always appropriate. To plane out, you generally need to widen the entry of the arc for maximum speed. But if the road ahead is a maelstrom of sloppy bumps, you’re asking for an explosion. Better in that situation to wash off speed and gybe tight. If you’re not fully planing on entry, you certainly aren’t going to be fully planing on exit. In situations where you feel the rails sticking and where the board hasn’t completely released, that’s the time to move to the back foot, crack it around on the tail to avoid a rail trip and forget the speedy exit.
POWER – AN ATTITUDE CHANGE.
When people are learning to forward loop, they head out looking for the smallest wave off which to stumble half-heartedly into a rotation. But when they can do it, they look for the steepest lip, because, with height, they realise they have time to complete the rotation – and completing the rotation is a lot less painful than half completing it. Basically they’ve changed their relationship with the wave – it’s their friend. For the less-than-confident gyber, their trigger to gybe is when they feel the pressure drop in the sail – i.e., when they’ve ridden into a lull. It’s an anti-catapult measure. But the planing gyber initiates when they enter the gust and feel the extra drive in the sail. Drive equals speed and speed leads (can lead) to a planing exit. The sensation of a planing gybe is that of being pulled through the turn all the way up to the foot change. Change your relationship with the power – it’s your mate – and gybe on the front of the gust, not the back of it. The most useful training you can do is just speed runs, bearing away into big gusts, sailing broad, enjoying the feeling of the front of the sail loading up, extending the front arm to sheet in and resisting the instinct to choke power by bending it. What I’m trying to say here without resorting to vulgar parlance, is that you’ve got to grow some ‘cojones.’
Stage 7 – carving off the heels
It’s confusing in that to change the feet you need to unweight them – but once changed the key is to drop the hips and load up the heels so keep the board carving. To linger downwind at this stage is to lose all your speed. If you stand too tall, the board will level out. The back hand has just released and so important at this stage is to maintain your outboard position, keep looking out of the turn and let the rig come to you.
Top planing point. Don’t go looking for the rig or you’ll drop towards it and stop carving.
Stage 8 – sheeting in broad
Assuming the wind isn’t nuclear, to plane out you have to sheet in off the wind – and the more off the wind, the more power you get … and the greater the chance of a catapult … but then, in the planing gybe, you’re constantly flirting with that balance tipping-point. But the fact is, it’s out of your hands. You can only sheet in broad to the wind, if you’ve maintained speed and the apparent wind has swung forward. The faster you carve, the broader you can exit. Duck gybes have a greater planing success rate because you get the power back on earlier – that’s what we’re trying to emulate.
Top planing point. Only sheet in when the boom comes within easy reach. The faster you’re going the broader to the wind that will be.
Stage 9 – exit planing
That last frame caught the moment just prior to sheeting in where the front hand is still forward on the boom following the rig change. If you sheet in then, the rig will be too far back and will sink the tail. A subtle but vital detail is to slide the front hand back on the boom just before you sheet in so the rig drops forward and powers the nose down and away. At the same time as you sheet in, actively level the board off with the toes to minimise drag and stop yourself over-rotating.
Top planing point. Hands back, rig forward, board flat, mission accomplished!
About that gybe.
It’s a step gybe in nicely powered up conditions. There are no ‘showy-off,’ lay-down, one-handed, ‘look-at-me’ bits. Laying the rig down and over-sheeting is only necessary if you’re stacked. If not, the game is to reduce the rig movements and just hold it at its most efficient angle to the wind all the way round, to maximise power rather than kill it. The more movements you make with the rig, the greater the chance of upsetting the trim.
TRANSITION ISSUES
Flipping rig and changing feet IS where the planing gybe is under greatest threat from wayward feet and hands. Turning yourself through 180º atop a fast moving object, while keeping it on its edge, as the sail swings round, pressures changing all over the place. It sounds like a tall order. So lets turn the camera round, get closer and identify the issues.
// This is a key set-up position for the foot change. Sail opening, shoulders following the boom and most important, pressure moving from front to back foot. With the hips to the inside, the front foot is weightless and ready to make its move.
// It twists out of the strap and the heel moves right over to the inside edge to take over the job of carving from the toes of the old back foot.On a bigger wider, board with outboard straps, it’s a big move.The feet may end up in this ‘demi-plié´ ballet position, but isn’t essential as the feet can move almost simultaneously. Note too the front arm has bent for the first time in the gybe. It’s to pull the rig upright for a moment and allow the front hand to slide to the front of the boom before the release.
// Here’s the frame that most clearly displays the key points of the planing exit. If you can get to this position, you WILL plane out. – the rig is swinging away on a straight front arm so there’s plenty of room to move hands to the new side of the boom. As the boom swings back, the hips ease forward to stop you being pulled onto the back foot.The board is still carving through heel pressure. The shoulders stay outboard and you let rig come to you – don’t bend forward to get it! The trigger to release the rig is the front foot landing. If you power up clew-first, the pressures in the sail suddenly change and you have to drop back to resist them. Coming out clew first is a good training step and a way to save a gybe but, unless you’re a practised freestyler sailing very broad to the wind, you’ll quickly lose speed.
HAVING A WORD WITH YOURSELF (AND GET VERY BASIC)
In the photo sequence I point out various details. You can’t possibly crunch them all – and don’t try to either. One at a time maximum. What helps more in the beginning is to approach it in broader terms, change the mind-set and focus on concepts, which, if grasped, make you automatically take up better positions and do the right things. Here are five such concepts.
Speed
Economists will like this. It’s just a numbers game. Most boards begin to plane at about 10 knots. That, therefore, is the amount of speed you need to exit with to bag a planing gybe. So the more speed you’ve got to start with, the more you can lose and get away with it. Enter at 35 knots and you’ve got make a series of major mistakes not to come out at least semi planing. Enter with 15 and you’ve got to be bloody brilliant to keep it going at the end.
Trim for speed.
It’s all about maintaining speed. So lets turn it the other way round. What do you do if you suddenly need to slow down? Sheet out, stamp on the tail and head up. Surprisingly that’s what many do when they start to gybe even when they intend to plane out. So do the opposite. Gybing fast is very similar to sailing fast in a straight line. It’s all about keeping a constant source of power flowing into the board and holding a constant trim angle, nose to tail. In the gybe, of course, you keep the board on its edge, but the other elements are the same. It’s sudden trim changes that cause imbalance and drag, so think about giving the board the smoothest contact with the water.
Control the Nose
Those three words contain the nub of the challenge. 94.3% of control problems occur because people lose contact with the nose. It’s an MFP (mastfoot pressure) issue. When you sheet out suddenly or let your hips drop behind your feet, you lose MFP, the nose flies up, the tail drops, you drag the bucket and stop. Gybes that stop before the finish, or over-rotate, invariably involve an upturned nose. Think of the mastfoot as the front foot of your body. You’ve always got to have pressure on it, which you maintain by dropping forward and pulling down through the boom.
The slow-down zone
Clock the wind direction. Look at the area from broad reach on one tack to broad reach on the other. Imagine it infested with sharks and mines. It’s a place where you don’t want to be. You need to be massively powered up to plane in this area (think Formula kit) so the longer you stay in it, the more you slow down. If you think about getting through it as quickly as possible, you instinctively carve and get on with it – and getting on with it is the greatest gybe-planing tip of all.
Focus on the ending.
Talking about getting on with it, this thing is only going to last 4 seconds if it’s to be a planer. You haven’t got much time to pratt about. So as soon as you initiate, you’re projecting both mentally and physically towards the ending. You’re looking for the exit and you’re immediately moving forward and across the board to where you need to be to retrieve the rig, sheet in and power away on the new tack. It’s when you have to make adjustments to gather the rig that it all stops.
Time now to let the images do most of the talking. What should become clear is the knock-on effect of the good and bad. “Why don’t you plane out?” “Because I mess up the rig and foot change.” Possibly, but it’s a symptom not a cause. The rig and foot changes are scrappy and awkward because you’ve lost speed, lost commitment, bent the arms, choked the rig, are standing over your feet, looking down at them too far back on the board etc., etc. The situation is an accumulation of errors so, it’s to the beginning of the gybe we look for the root causes. ‘Start well, end well’ is the mantra. Oh yes, and one other thing … initiate the rig and foot change about half an hour before you think is sensible.
By happy coincidence Harty’s new DVD ’10 steps to gybing’ which he made with Dave White, is now available by contacting him on harty@peter-hart.com. It discusses in beautiful moving Technicolor all the above and more. To find out more about his legendary clinics email him for his newsletter, check the website www.peter-hart.com or ‘like’ his Peter Hart Masterclass Facebook page.