PETER HART MASTERCLASS – MIXED UP GYBES
The big enemy of gybers is ‘sameness.’ The best continually adapt every element to compliment their kit and the situation in front of them. In part 2 of his gybe mastery series, Harty suggests yet more ways in which you can mix it up.
Words Peter Hart // Photos Graham White, Hart Photography, Simon Bassett, Marc van Swoll & Nick McCarthy.
Originally published within the October ’18 edition.
If I’d never typed in my life and went to typing school today, I wager that after 2 weeks I’d be better than I am now – and I’ve been tapping away in my own idiosyncratic way for about 35 years. Experience is a double-edged sword. Make mention of an ‘experienced’ performer and on the one hand you think of an ageing but wily individual whose vast bank of encounters hand them a strategy for every eventuality. On the other, you have those for whom ‘years of experience’ has basically meant repeating the same experience a million times. That’s my typing. I’ve never moved on. It also describes a lot of people’s gybing. In the beginning you get offered a gybing template, which given benign conditions, kind of works and produces a few dry ones. But with a modicum of success comes the temptation to rest on laurels, quit experimentation and not try anything which might provoke a retrograde step. What also happens in your formative years is that you get offered a list of strict, ‘don’ts.’ Don’t bend your front arm, don’t lean back, don’t stand up, don’t sheet out etc. They’re well meaning in that they help you over initial hurdles, but like the boy who’s been told never to talk to strangers and then grows up to be a hermit, unless you moderate those early commandments, they can severely stunt your growth. (You can actually legitimately do all the above … given the right situation.) The fact is that every aspect of the gybe from how you set up, where you place hands, how you distribute pressure between feet, position of head, timing of rig and foot change, placement of feet etc. is variable. Nothing is ‘wrong’ as such – but it may be wrong for that wind and water state on that kit and given your chosen radius of gybe.
So that’s where we left you last month – challenging fixed notions and showing how you can adapt all those aspects of the gybe to shape each one according to what’s in front of you and the kit you’re on. There’s a place to start.
“ By sticking with one tested gybing method, you may well improve. However, that improvement often arises from accruing reactive skills – like becoming more alert, agile and able to recover, rather than developing into a more flexible, and versatile technician.”
THE LIMITS OF WIDTH
The main difference between gybing wide, racy freeride boards and manoeuvre oriented narrower ones, is not how much you can bank them over, but how suddenly. You have to get the wide board up to speed first by bearing away and coming in wide; on the FSW, with a bit of skill and commitment, you can just lay the whole lot over without notice.
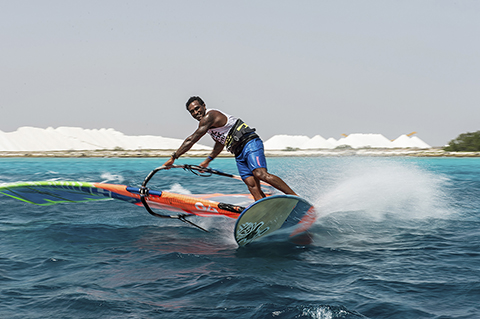
Taty Frans gets almost vertical as he carves this 85cm wide freeride – but he had to come in wide and fast. Photo Marc van Swoll.
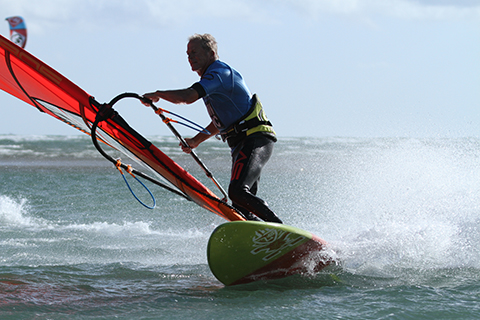
As long as you’re fully planing and co-ordinate sheeting in with foot pressure, you can lay the FSW over with the minimum bear away. Photo Simon Bassett.
The world beneath your feet
The ‘gybe according to kit’ question is so huge that I’m going to be led by a recent email.
“I have 2 boards, a 100 litre freewave and a 140 litre racy freeride. I love gybing the freewave, but due to my size (90kg) I spend most of my time on the bigger board. My question is how much can I manipulate a gybe on this board? Whenever I try to bank harder and turn tighter, I tend to stall, especially in chop. Is it me or am I asking the board to do something it’s just not designed to do? The simple answer to the above is: a bit of both – design limitation and a hint of pilot mischief. There are two ways to tighten up a carving turn and throw some more spray.
The first is to shorten the rail. That is to say favour the back foot, lift the nose and turn just on the rear section behind the footstraps by sheeting in against the back foot. It involves a little tail sink, a loss of speed and is part carve, part pivot. The other way is to keep a more level board nose to tail and then simply bank the board over more steeply. You can pivot and carve tightly on all board shapes and sizes, but some do it, let’s say … differently. Boards with ‘wave’ somewhere in the title are designed with tight turning in mind but more specifically, to initiate turns suddenly. That is to say go full speed from reach to full rail carve with minimum bear away. A naturally tight turning radius is an essential quality if you’re to turn on the wave face and not outrun it. The benefits of less volume are that the thinner rails yield easily to foot pressure, grip and don’t fight back.
The subtle blending of rocker and rail shape mean the edges, even the front sections, don’t stall so easily and keep pushing through the mush even at relatively slow speeds. And thanks to the inboard settings, the footstraps don’t catch the water in banked turns.
Moving up onto the bigger board – when it comes to making tight turns, especially if you’re fully powered, you are to some extent, fighting the volume.
The easiest way to tighten the radius is to turn off the tail. But you have to moderate your speed. Go too fast than the wide tail creates so much lift that no matter how hard you push, you can’t hold the rail in.
As to how steeply you can carve it? You will see slalom racers on their widest boards cranking them over almost at right angles (to wit the Taty Frans shot) but the difference is that they can’t do it too suddenly. The trick to gybing big boards is to widen the entry of the gybe. With extra speed you skim over the chop (not slam into each trough) – and as you ease the board over at speed, the rails lift and stay high out of the water. It’s when you sink those thick rails too deep at too slow a speed (and sheeted out) that you have trouble. But it’s also a function of design. Every board is different. When I test a new board I choose the same patch of water and then with every run, bank it over a little earlier or a little more steeply. I watch the inside rail and see how much I can engage before I feel it catch. By varying the shape of the arc and the speed of entry, you quickly get a feel for its limits.
To sum up – to gybe a big board, exploit its strengths, which if you’ve grown up on squirrely kit, may not be immediately apparent – but they are there.
They’re fast relative to the wind speed, which means downwind you’re potentially handling a very light, depowered rig. That allows you to go for very early rig and foot changes. A big board glides. Downwind you can level it off as you perform rig and foot changes and it keeps going, increasing your chances of a clean transition and planing exit. We’ll add more flesh to these details as we progress.
“Hopping from one set of kit to the other is the best way to expose your shortage of gybing techniques and strategies (or confirm your rounded brilliance).”
TO CARVE OR GLIDE AS YOU CHANGE THE FEET.
One of the strengths of wide, speed oriented boards, is that they have more momentum and carry their speed during the transition phase. If the water is smooth, a tactic employed by racing types eager to maintain speed, is to level the board off downwind to allow the board to glide, and then power up the heels and finish the turn off as you sheet in. But on smaller boards and especially in chop, it’s better to keep the board on its edge all the way round.
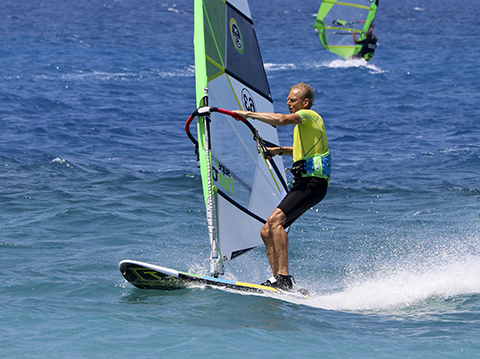
Levelling the board off downwind doesn’t work if it’s choppy because the nose rocker slams into the wave faces. Photo Hart Photography.
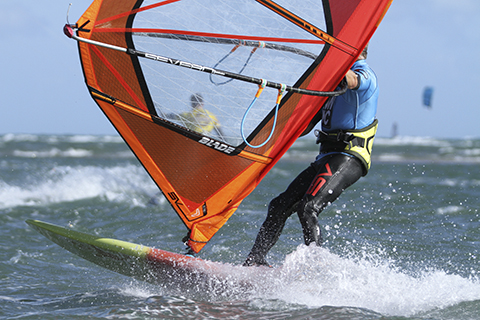
The best tactic in chop on all sizes of board is to keep the board on its edge all the way round. Photo Simon Bassett.
SPREAD ‘EM!
To stop the board sinking and stalling at the end of the gybe, many place the back foot right forward on the rail – it’s a hangover from the 80s when tails were as thin as a pin. But that narrow stance limits your stability and your ability to manipulate the arc. Think like a surfer and keep the feet at least hip width apart.
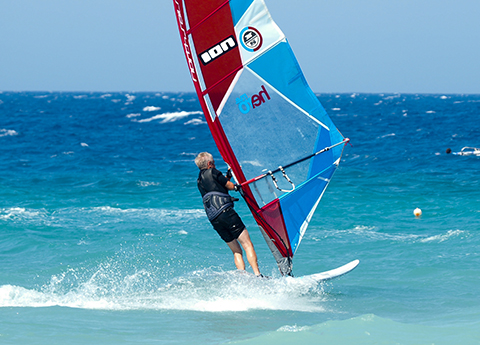
A symptom of having the feet too close together is that you’re forced to stand tall and lean back.
Photo Hart Photography.
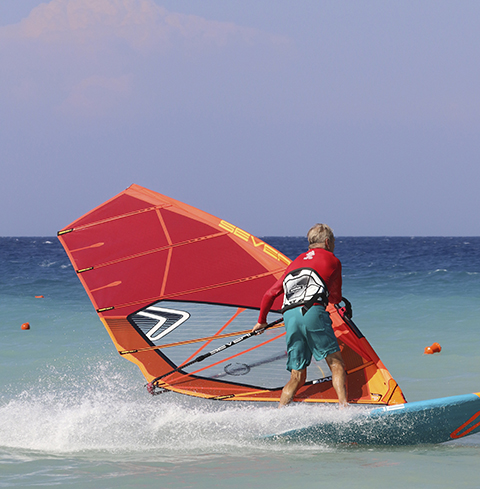
The wider the feet, the more control you have of the rail and the more you feel like leaning forward.
Photo Graham White.
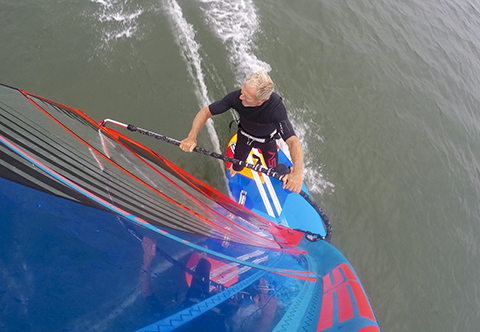
On wider boards (95cm here), to maintain that hip width stance and prevent yourself doing the splits, you bring the back foot a little further forward on the rail.
Photo Hart Photography.
TWEAKING THE TRANSITION
This is not an official exit poll, but ask people where their gybes falter and 98.2% will point the finger firmly at the transitions – the rig and foot change. This one phase contains so many variables – order, timing, speed, exact placement etc. – that to improve you have to change something (or else madness beckons). And in changing something, and then playing with the various elements, you may not only improve your hit rate, but also feel how little alterations shape and enhance every aspect of the exit. Let’s start at the back.
The back foot – where on the rail?
Do you make a conscious decision where to place your back foot on the rail when you take it out to gybe? Some do, but most just put it where they’ve always put it, which is … wherever. However, its position not only influences how you can shape turns, but changing it can also mend rotten, deeply engrained gybing habits. For example:
Move it back.
Many instinctively place their back foot forward on the rail. Logic tells them that pressing on a thicker section, they’re less likely to sink the tail, stall and over-rotate, which happens ALL the time. 80s gybers did it to keep the pressure away from super skinny ‘pinny’ tails. But it wasn’t good practice then and is even less so now. On a board less than about 75 cm wide, if you bring the back foot forward, curing one apparent evil will provoke a bunch of others:
– the feet are too close together. You’re less stable and forced to stand too tall.
– at foot change time the feet trip over each other.
– you’ve lost your rear anchor point so won’t lean forward or stretch the rig forward for fear of a catapult.
By moving it back so you feel the heel just touching the front of the strap, everything changes.
MFP!
Initially, like an apprentice wave sailor learning to carve with both feet in the straps, you will sink the tail, especially if you’re naturally a back foot sailor and gyber. But don’t compensate by moving the foot forward, but instead, load up your third foot – the mastfoot. The key to sweet gybes lies in controlling the nose, which you do by leaning body and rig forward onto the boom and increasing mastfoot pressure. With the back foot back, you have to project forward … or else you sink.
Think of this – the further you get your front hand from your back foot, the more immediate control you have of the nose and tail trim.
SHIFTING PRESSURES.
What allows you to shape the arc of the gybe is shifting the pressure from foot to foot to either lengthen or shorten the rail. The wider your gybing stance, the greater flexibility you have. With your back toes over the thinnest part of the rail you also have ultimate control of the banking angle. With them close together, you’re locked into one arc.
SLICKER FOOT CHANGES.
A wide gybing stance opens up space on the board and encourages you to move the feet into the right positions at the end of the gybe. The aim when turning and stepping the feet is to move away from the tail so you keep things level as the rig rotates. Here’s a real life case of a week ago. Chris, a competent gyber, would twist his front foot out of the strap and sweep it all the way back to just in front of the back strap … and up would pop the nose. He did it because he had no choice. The old back foot was too far forward and so in the way. When he spread his stance, he naturally tucked it just behind the front straps, where the board is thicker and less sensitive to pressure change, and his stalling problem was cured instantly. Hands matching feet. On wider boards of 75cm plus you do have a choice where to place the back foot. On the really wide ones, if you place it all the way back and outboard you find yourself with an impossibly wide stance. Bringing it forward on the rail allows you to keep the feet at a comfortable spread. But what’s crucial is to have feet and hands working together. On a beam reach, you know you’ve got a balanced setup when you look down and see your hands lying above their respective feet. It can be the same when gybing.
For example – back foot forward and rig forward and open (not over-sheeted) and you will carve a long, shallow arc with the board level nose to tail. Bring both the back hand and back foot back – then you naturally sheet in harder, direct that pressure into the back foot and tighten the turn.
THE HEAD RULES THE HEART
It’s the best tip of all, ‘look where you want to end up … not where you are’ but still the hardest to act on. Whenever we’re scared or unsure, we
automatically stare at the thing that’s troubling us. In the gybe transition, that tends to be the mast, the boom or your feet. But another approach is to regard your head as ballast – 5kg as it happens – and therefore a very efficient way to shift weight and alter pressure. If you turn your head away to look at the exit of the gybe, it’s very hard NOT to keep pressure on the turning edge.
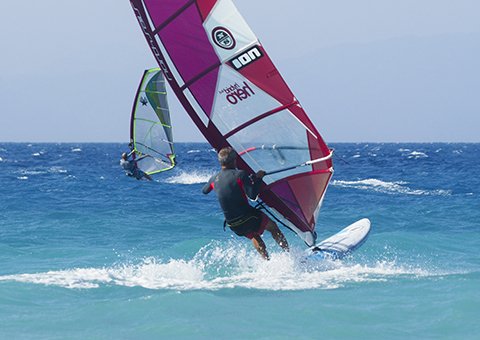
It’s the end of a strap to strap gybe, and if you stare forward at the mast, your hips and upper body will get blocked over the centreline and the carve will stop.
Photo Hart Photography.
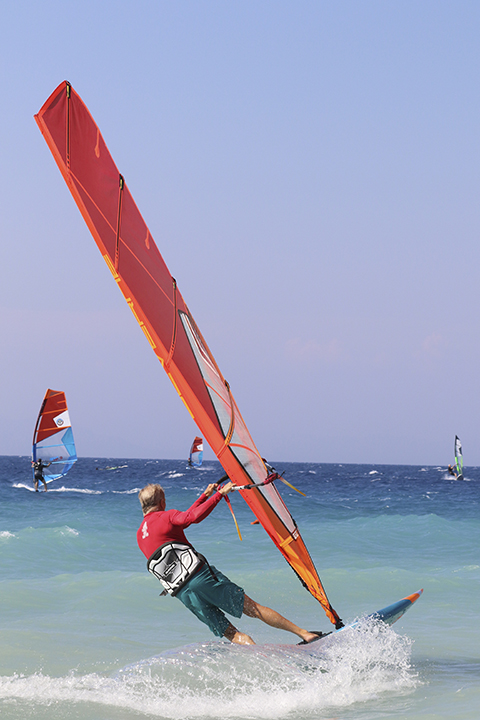
But if you turn the head to look out of the gybe, your shoulder and hips will follow and board will stay on its edge.
Photo Graham White.
TRANSITION OPTIONS
We tend to group the transitions into two camps – the ‘strap to strap’ gybe (aka ‘switch foot’ gybe), where you flip the rig before changing the feet; and the ‘step’ gybe where you switch the feet first, ‘stepping’ in front of the new set of straps, before flipping the rig. The latter is more familiar being much the same order as the non-planing ‘flare’ gybe. And it’s also preferred by most as by stepping you level the board off, control the nose and find yourself in a better position to resist the power at the end of the gybe. However, as mentioned, there is so much room for tweaking.
Foot change, early or late?
It’s horses for courses and much depends on the width and speed of the arc and the conditions.
The early change.
Looking to plane out on flat(ish) water where your speed relative to the wind is good, everything points to an early foot change just after passing through the wind. I urge my charges to do this as a matter of course. The foot change is the time when you’re most likely to ‘un-trim’ the board and knock it off the plane. But the faster you’re going when you do it, i.e. early, the more stable the board is and less likely to be upset by moving feet. And in order to plane out, the aim is to sheet in as early as possible on the new tack. The more speed you carry through the wind, the more the apparent wind comes forward and the broader you can sheet in (on the edge of a catapult). By changing the feet early, you’re in immediate shape to take control of the rig.
The delayed change.
By delaying the rig and foot change, you stay in control of the carve and the rig during the critical downwind, broad reach to broad reach area where you’re most likely to lose control – hence it’s a good option in windy wavy conditions – and especially on naturally tight turning boards. And if you’ve turned super tight, you may need to steady the ship by powering up clew first for a few seconds.
Stepping – the foot placement.
As mentioned, exactly where you place feet at the beginning and the end of the gybe is something many don’t see as an important variable (it’s not like you haven’t got anything else to think about) – but their positions as you step are critical.
The front foot – forward or back on the rail.
The further forward you place the front foot as you step out of the gybe – right up to the mastfoot in some instances – the more you lower the nose. It’s the obvious option after a tight slashing gybe on a small board when you need to get the edges to bite and kill the rotation, or if you’ve just messed one up and have sunk the tail. However, lowering the nose too much can also kill speed. If you want to plane out, you have to keep the nose up to let the board skid away on its planing ‘flat’, in which case place the foot further back, between the mastfoot and front straps … or maybe even further back than that?
The STEP to STRAP!
Some boards, notably short fat, racy ones, will only plane if you get back into the straps first and pump from there. To stand forwards is to lower the nose, create a bow wave, and stop. So when gybing these boards consider another transition category, where you step before releasing the rig, but step straight onto the straps. It’s also a foiling technique and the method favoured by many Olympic and slalom sailors. It is now and forever known as the ‘STEP to STRAP’ gybe!
The Transition – to glide or carve?
When you change the feet, do you have it in mind to immediately carve on the heels – or perhaps just glide a little? It depends on the size and design of board and the conditions. Working on people’s transitions, what I stress most is the need for ‘pixie’ feet – and moving them without the board knowing anything’s going on. The front foot must twist out of the strap and slide across to hold a constant pressure on the inside edge and so keep the board carving at the same angle even as the feet are being changed. Many gybes fail because switching feet has given the wrong edge a kick and sent the board off in an unplanned direction. The board slices through chop if kept on an edge. If you level it off downwind, you present a flat nose to the wave faces. It only takes one to stop you dead.
But given a calmer arena and a wider board, there is another way. As mentioned, bigger boards generate momentum and glide further when depowered. So an approach oft favoured by racers and ‘slalomists’ is to come in on a wide arc, then level the board off downwind and let it glide as they change the feet, and then power up the heels to finish it off. Changing the feet over a flat, gliding board means you’re less likely to catch your heels in the water.
HANDY TIPS
The hand movements you use in the rig change are often engrained on day one and are truly difficult to shift … but are often the cause of many unsatisfactory endings. There is no right way, but if they’re leaving you too close to the rig or corrupting your carving stance, then change them! Some prefer to go boom to boom by passing the new front hand OVER the old front hand to the new side of the boom. Fine – but it can make you stand up, move inboard and take pressure off the edge. By passing the hand UNDER the other, you’re encouraged to stay compact.
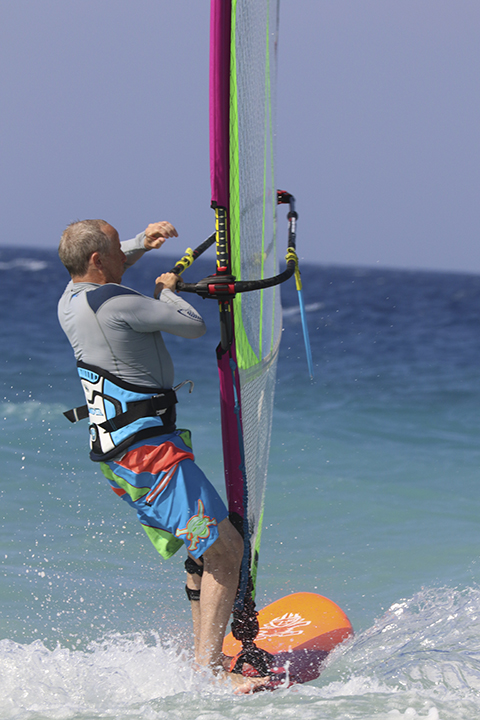
By passing the new front hand over the top, you can find yourself standing up and inboard. Photo Hart Photography.
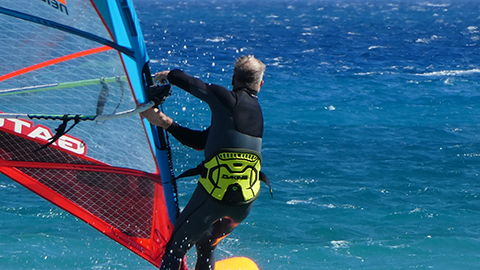
By passing the new front hand under the old one, it’s easier to stay low and keep the board carving. Photo Hart Photography.
THE HIPS, THE HIPS, IT’S ALL IN THE HIPS.
If you take one thing away from these two lectures in gybe mastery, this is it. At all times, just think about your hips. They represent your centre of gravity. In all balance sports you lead with the hips. When it comes to deciding the shape of your gybe, don’t just think of rail pressure. Think of your position relative to the curve. For you to control the forces produced by the turn you must always position to be the inside of that curve. Apart from the moment when you cross the board to commit to the turn, the hips are never over the centreline. Look down and you should see you harness hook over, or to the inside of, the inside edge. When it comes to deciding the radius of the turn, think of it as a circle. As you initiate, imagine the centre of that circle and project your hips towards it. For a wide radius turn, that means the hips will be further forward, level with the front straps. For a tight turn, they’ll project further back, level with the back straps. And most importantly, the hips move before you pressure the edge. If you carve first, it’s already too late!
If you just focus on hip position, so many other apparently incurable issues, like heavy feet and jagged carving, are resolved. We’re nearly there, apart from arguably the most important bit of all …
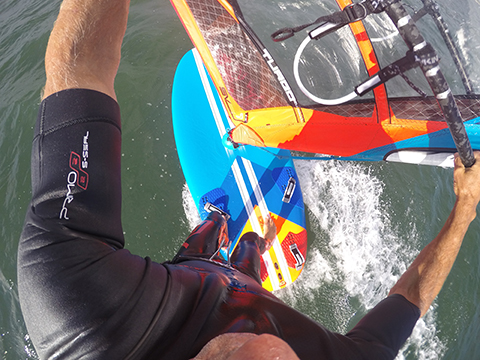
On short and racy wide boards, you can change the feet first as per the step gybe, but step the front foot straight into the strap, as a way to hold the nose up and keep the board planing on its flat … but only if you’ve carried speed. Photo Hart Photography.
THE HEAD – IT’S NOT JUST ABOUT WHERE YOU LOOK!
It’s become the mantra of every balance sport out there – ‘where you look, is where you go.’ And in windsurfing, the very act of looking towards the exit of your turns stops you staring at irrelevant objects like feet and boom and encourages a stable posture – i.e. not hunched up. Looking the right way is already good – but you can look just by rolling your eyeballs – that doesn’t help much. For me the more important focus is the turn of the head. Unless you are unnaturally supple, you can’t turn the head without turning shoulders and hips. It therefore has a huge influence on your balance. The head also weighs in at a chunky 5kg, so its position has to effect weight distribution and therefore how you carve the board. For example, if you drop the head forward and look around the mast you will naturally favour the front foot, drop the nose and carve a long arc.
If you turn the head to look over the back shoulder past the clew, your weight will flow on the back foot and you will tighten the radius. For people struggling with rig and foot changes, I suggest it’s that turn of the head to look past the clew that initiates the foot and rig sequence. As you turn your head, the hips flow over the back foot and the pressure moves off the front foot (the one in the strap) thereby making it easier to move. It’s when your weight gets stuck on that front foot, that’s when things get messy. And to finish, here’s a quick user’s guide. There’s a lot of wordy ‘stuff’ out there. The trick is to isolate a tip that resonates with you and then focus on one body part at a time. Errors tend to be interrelated. Curing one element can have a happy knock on effect. For example, your front foot gets stuck in the strap because your hips (and weight) have got caught over the centreline; but your hips are stuck because your head is looking down – you get the idea. May your experiments be fun and fruitful!
Harty returns next month with more research and lessons from the frontline as the windy season starts. Check out his website – www.peter-hart.com for more info. about his 2019 clinics.
