PETER HART MASTERCLASS | THE SPINNY GYBE
It goes by many names, but the basic pivot gybe is not only a practical ‘get out of jail’ card, but also introduces technique elements that should take your regular carve gybing to another level. Harty elucidates.
Words Peter Hart // Photos Radical Sports Tobago
Originally published within the April ’19 edition.
I believe it’s called ‘skill asymmetry’ – the condition whereby an unusual level of brilliance in one area belies a total lack of it in another. It’s the astrophysicist who understands black holes and relativity but can’t tie his own shoelaces. I’m trying to describe to Adam the concept of the ‘squirt’ turn. It’s a downwind wave riding technique where you pivot the board around at the top of the wave so you start the ride shooting high along the face, rather than dropping straight down it, turning too late and outrunning it. It’s a common problem especially in cross-on winds where your natural course is upwind the ‘wrong’ way.
“How do you mean ‘pivot’ the board round?” He asked.
“You know … spin it on the tail using the rig … like half a flare gybe…”
“Flare gybe?”
It soon became clear that Adam, despite being a wave sailor with some history, had never learned to spin a board around in light winds, or any wind for that matter. After an all too brief non-planing apprenticeship, he’d moved straight onto planing and carving moves.
Thanks to the accessibility of early planing boards, the first gybe many attempt is the carve gybe. Speed and gusto can compensate for a lack of finesse. Having scrambled out of a few and ticked the ‘dry’ box, there’s little incentive to regress back to learning the slower, easier and surely inferior version favoured by non-planing beginners. Well stop there. Not only is the pivot gybe tactically precious and technically harder, but also equips you with the skills to improve, intensify and vary your planing gybes.
THE END is NIGH – Forward then Release.
The majority of slam gybe failures happen right at the end as you struggle to handle a powered up, clew first rig while standing close to it right by the mastfoot. As you release, it either knocks you off or sends the board scuttling into wind. The trick lies in putting some space between you and the mast before releasing.
Just after the foot change the mast is behind you. Don’t release it from there!
But pull the rig upright, then throw it forward so the mast is between you and the front of the board. Now you have space to release the rig and handle it at arm’s length.

SLAM or TIGHT RADIUS CARVE – shared skills.
A speedy, wide arc, full planing carve gybe and a tight pivoting carve gybe look completely different in terms of shape, technique and tempo. The carve is all about bearing away into a wide entry, getting on the front foot, dropping the rig to the inside of the turn, engaging all the rail, extending the rig forward and yielding to the power. Whereas a slam gybe involves heading up, leaning the rig to the outside, dropping the hips back, resisting the power, driving into the back section and spinning tight on a flat tail. But for the tight radius carve, you blend both sets of skills. You come in tighter, stay on the plane, leave the rig upright, sheet in hard, drop the hips back and drive all that power into the back foot. The difference with the tight radius carve is that you’re just planing; you initiate the turn on a reach rather than a close reach, and, of course, you put the board on its edge.
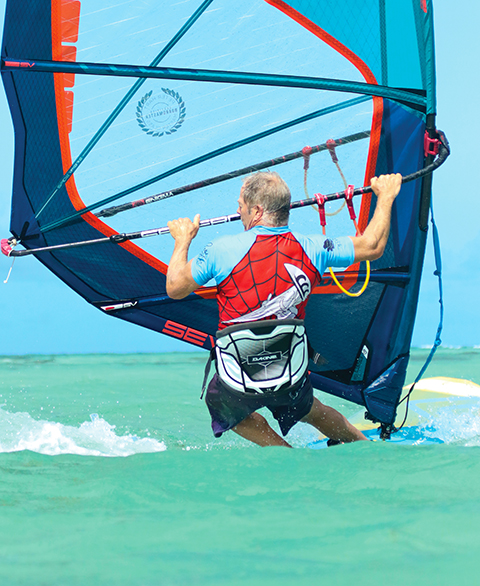
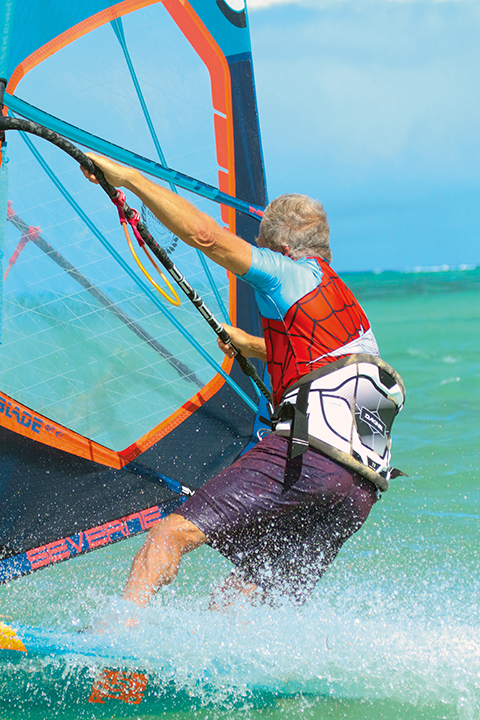
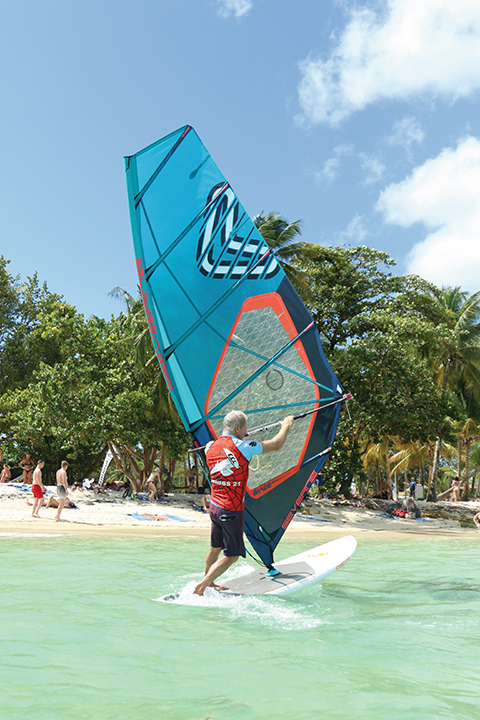
The slam gybe – rig tilted to windward and board level to allow it to pivot.
The tight radius carve – rig upright, board on its edge – but the body shape is much the same.
BLURRING THE CATEGORIES
The common wisdom decrees that there are two sorts of gybe – the non-planing one where you lean back, sink the tail and use a rig scooping action to turn the board. And the planing carve gybe where speed and momentum carry you round a gripping inside edge. But there’s also a hybrid performed at various stages of planing, where you carve hard and use a similar rig action to the pivot gybe. This tight radius carve/pivot gybe is the most useful and dynamic transition in windsurfing in and out of waves. In short if you can’t perform an acceptable pivot gybe, you’ll find yourself seriously short of tools as you attack the upper levels.
WHAT?
The gybe in question is the one where you angle the rig over to windward and mastfoot pressure drives the nose downwind – not so different to lining the board up prior to beach and waterstarts. And in the more dynamic versions, you lift the nose to help the board pivot on the tail. It goes by various names – ‘flare’, ‘racing’, ‘chicken’ and ‘slam’, which describe subtle variations of the same theme.
Flare Gybe
It’s the original model developed on long boards and which is now a favourite on WindSUPs. Long edges resist turning so you step right back to sink the tail, get them out of the water and reduce that resistance. It was once a freestyle trick, the aim being to get the nose pointing flamboyantly high like a ‘flaring’ horse.
Racing Gybe
It’s a less ‘showy off,’ more functional version of the above for non-planing winds. The aim rounding a mark is to turn tight, but also maintain speed. So depending what’s in front of you, you go for a very early foot change, run a flatter board to reduce drag and go for an extreme rig scoop by getting the hands right to the clew end of the boom.
Chicken
It’s any gybe that involves turning round and beating a hasty retreat when faced with an impassable set of waves. The impact zone is a gusty place, so this gybe is usually performed off the plane, desperately short of power, on a small, semi-submerged wave board. The hallmarks of the technique are small delicate rig movements and holding trim with the daintiest feet very near to the mastfoot. It’s a skill that has saved many a dollar.
Just for the record, I have issues with the title. I used to keep chickens and although some do have a habit of running away, others can be highly belligerent. I had one named ‘Buck’ that was a complete psycho. Furthermore, there’s nothing cowardly about avoiding a certain drilling. ‘Aggressively sensible’ gybe would be a better label…although not as catchy.
Slam
This is the small board version of the flare gybe performed in the straps. It’s arguably the most tactically powerful transition in the book, allowing you to turn suddenly and quickly, in a very short space without losing ground. In fact done well, you gain ground upwind. The stronger the wind, the quicker the board spins, the more force you have to resist, the greater angles you have to take up and the faster you have to move. It also looks good and involves lots of spray. The key technique points are that you initiate the move by heading up to soften the power, and sheeting out to allow the nose to rise. Then by sheeting in and driving all the power into the back foot, you ‘slam’ the board around.
Warning!
In certain manuals you will hear the move referred to as the ‘non-planing carve gybe.’ And it does share certain elements. However, it’s absolutely not a carve. If you put the board on its edge off the plane, it trips over. For all the quoted variations of the pivot gybe, you keep the board level so it can spin on a flat surface.
PRETTY PICTURES
Photos speak a thousand words when it comes to the ‘how to …’ of this move. Study, visualise and imitate the key moment just as the board passes through the wind. See how low you have to be; how far to the inside you drop and how the board turns around you – you don’t follow it. Imagine too the extreme separation between upper and lower body as you spin through the wind, hips pointing in, shoulders turning out to face the rig as you sheet out. So coming up I shall focus on specific elements of the skill which are key to this, the carve gybe and windsurfing in general.
FEET
Many learn to gybe in light winds on a wide or long board. The traditional method is to bear away, step back into the ‘running’ stance with feet parallel facing forward and then steer from there. But on a shorter, narrower board, that running position with both feet off the centreline is hopelessly unstable. Whichever board you’re on, imitate the position you’d be in the footstraps – one foot forward angled slightly in, the back foot back across the centreline (it’s the most stable posture, as adopted by fencers). Not only will the foot change be the same as for the carve gybe, but it also introduces the key skill of moving between front and back foot to drop or lift the tail.
IN THE FOOTSTRAPS – AS EARLY AS …?
In as little as 8-10 knots, people are surprised at how much turning force the rig produces and how easily they get flung to the outside. That force is SO much easier to control if the front foot is back in the strap. Even if there’s not enough wind to plane, you can still drop the foot in the strap so long as you lean forward onto your front hand to increase mastfoot pressure and hold the nose down. How early you can step into the strap depends, of course, on the size of the board and position of the strap. If you’re doing it on a slalom or free-race design with straps right out on the rail, don’t bother, leave the foot in the middle. Having the foot in the strap imitates the carve gybe foot change, and drills the correct sequence – i.e. the foot in the strap moves first before (or as …) the back foot steps forward. As a by product of this, you might discover that you can get into the straps earlier than you thought, which in many instances, is the key to early planing.
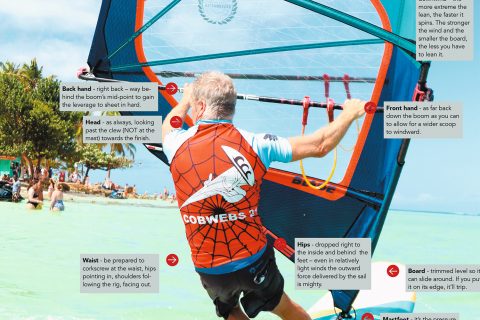
WIDE HANDS – THE KEY TO SHEETING IN, IN ALL GYBES
Sheeting in is how you power up the mastfoot to turn the board. Because the pivot gybe is performed almost stationary, even in a force three the rig is a lot more powered up than for a carve gybe – hence sheeting in, and crucially over-sheeting to control that power, is absolutely key. Dropping the back hand back is on most people’s gybe preparation ‘to do’ list – but few move it far enough. With the hands close together, you can’t really change the sail’s angle, hence people tend to pull on both arms, which feels like sheeting in, but actually just pulls the rig back. It’s only if you drop the back hand behind the boom’s mid-point that you gain the leverage to close the sail. Because the basic pivot gybe happens off the plane, you are generally in a calmer place, with a little more time and a better chance of remembering to move the back hand. But the trick is to move it twice – first as you set up; but it’s when you move the rig forward and across to windward that you can move it again and reach right down the boom. This secondary move is what most also forget in the carve gybe because there’s too much else going on. The aim is to make this secondary hand move so automatic that it feels totally weird to forget.
It’s an issue in both gybes that people mistake pulling on the rig with both arms, for sheeting in.
CROSSING THE LINE – CRAZY COMMITMENT
It’s a constant theme in carve gybing and wave riding sermons, the concept of your hips crossing over the middle line of the board to make yourself the centre of the circle and the feeling of the board turning around you. The board follows the curve and you cut the corner. It’s also a critical concept to the pivot gybe.
In the carve gybe, if you follow a long arc, the centrifugal forces aren’t so great. You can therefore remain fairly neutral and uncommitted over the middle of the board – it’s not desirable; you’re unlikely to plane out – but you can get away with it.
However, in the powered up pivot gybe, unless you cross that line and drop right to the inside before the board turns, you get flung into the hedge.
In windy cases, an extreme slam gybe looks more like a fall to the inside followed by an immediate clew first waterstart – that’s how low your hips need to be!
Practising the slam/pivot, gives you an idea of what committed hips feels like and can only improve your carves.
SUP TRAINING
The very best tool with which to master the pivot gybe is on a long WindSUP because it all happens in stable slow motion. You get to feel how the rig scoop and mastfoot steering works and above all, how turning is affected by your position fore and aft and by how much edge there is in the water. Another skill to practice, which will be key on the shorter board, is being able to move your feet back on the board when off the plane, but still maintain trim by leaning forward on the boom. You can focus on hand positions – moving the back hand right back and then discovering that it’s by extending the front arm to windward that you power up – NOT by heaving on both! As you spin, you can play with the timing, exiting switch foot and clew first and stopping the rotation just by leaning forward on the boom. Anyone who was brought up flare gybing in the 80s finds the whole slam gybing thing a complete doddle.
On a close reach, sheet out, drop the feet back and control the nose by leaning forward onto the boom.
The key bit, initiating the turn by turning the head, extending the front arm and dropping the hips back.
Leaving the feet in their original positions as if they were in the straps, exit clew first, delay the foot change and control the rotation by leaning forward on the boom.
BOLD ANTICIPATION
Given a small board and a loaded sail, everyone bar none, will suffer the two classic falls – getting thrown to the outside like kids off a roundabout – and over-rotating (“stop this thing … I want to get off!”) Both falls result from a lack of anticipation and failing to realise how fast the board will turn and how quickly you need to get into your foot and rig change to kill that rotation. We talk about the carve gybe lasting just 4 seconds – a committed slam gybe lasts just 2. No sooner are you into it than you’re out of it. The act of sheeting in is the trigger to sheet out and step forward. The moment you initiate you’re thinking about moving towards the exit; turning the head to look past the clew; dropping the hips to where they need to control the power on the new tack; and projecting yourself forward so you can control the nose and the speed of the rotation. Sounds like the same tips for a carve gybe? Yes – just more quickly!
The element missing from so many dynamic moves is bold anticipation. You, the human, have to project into the turn before you change direction so you’re always one step ahead of the board.
SEPARATION
Even more so than the carve, the pivot gybe – a well controlled windy one at least – demands that you corkscrew at the waist. The aim is to keep turning until you’re across the wind on the new tack before switching feet and rig. For that to happen hips must be pointing into the circle, while shoulders turn to face the rig as you sheet out. Those with concrete waists need not apply.
DIFFERING ARCS
Here lies the biggest difference in the carve and pivot gybes. In the carve, at the beginning of the arc you bear away to increase power and speed. In the pivot or ‘slam’ you head up to reduce power and speed. You can’t ‘slam’ or pivot the board around at speed because the tail creates too much lift and fights back.
CLEW FIRST
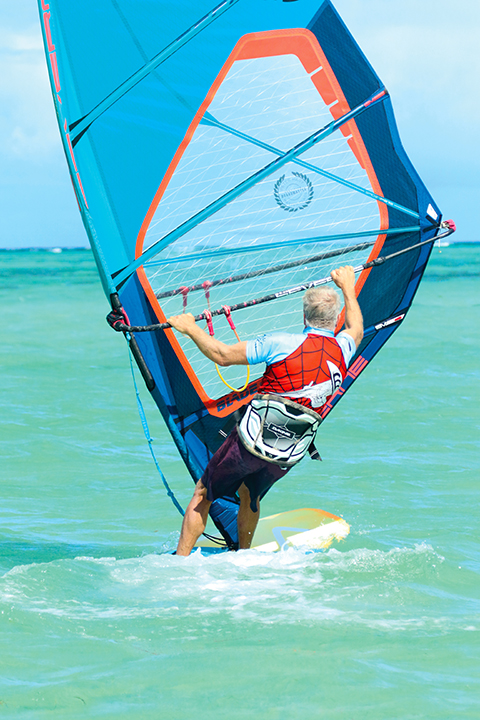
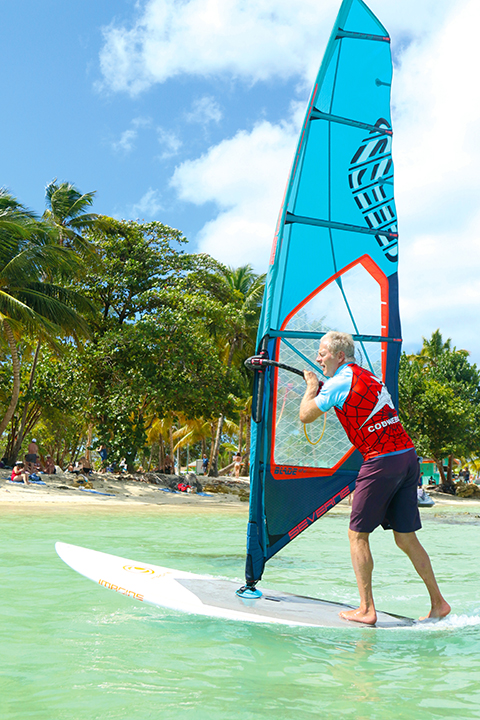
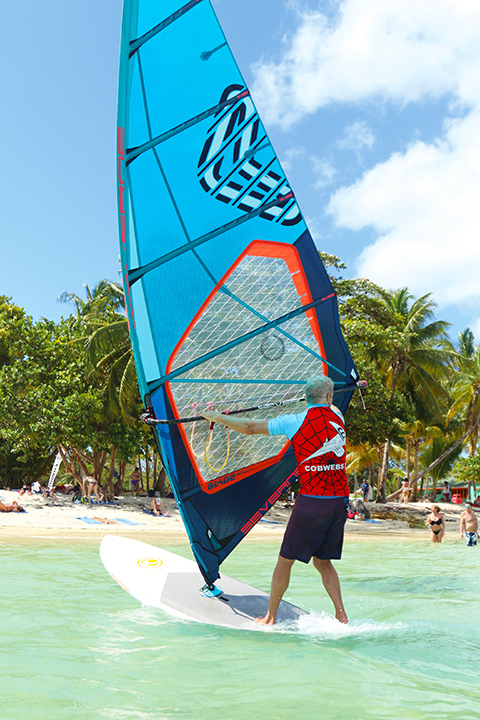
The challenge of a fast spinning gybe, as alluded to, is to stabilise the ending. The transition follows the same sequence as the carving step gybe – open the sail, change the feet first and then flip the rig – but with subtle differences. When you switch the feet, to drop the nose and halt the spin, you step the front foot right up to the mastfoot (do that in a carve gybe and you kill your planing speed, hence you place it slightly further back to keep the nose up). And secondly in the pivot gybe, you hold on for a few seconds clew first. You need that immediate counterbalance to stabilise yourself, lift yourself from your low down committed position and too generate a little speed and float, important on smaller boards.
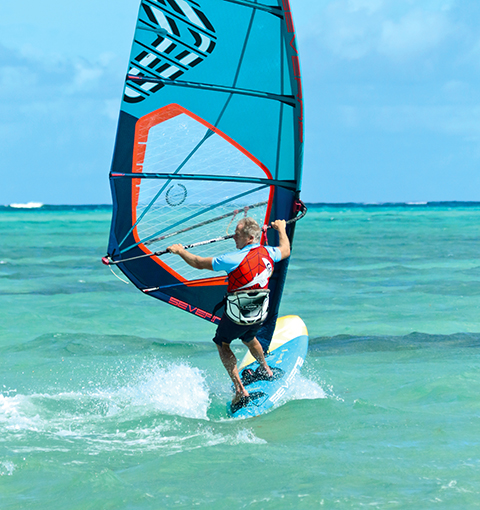
Setting up for the big slam – front foot in the strap, pointing upwind, hips dropping to the inside anticipating the spin, sail sheeted out to let the nose rise – and back hand so far down it’s almost falling off the end.
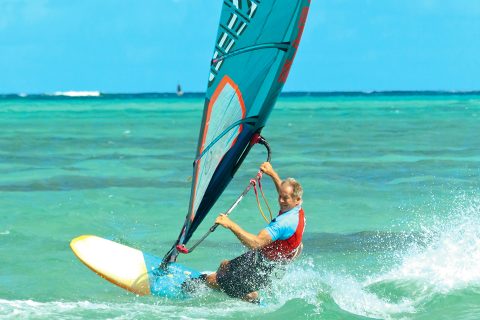
It’s going suddenly from power off to power on that brings a smile.
FLIPPING DIFFICULT
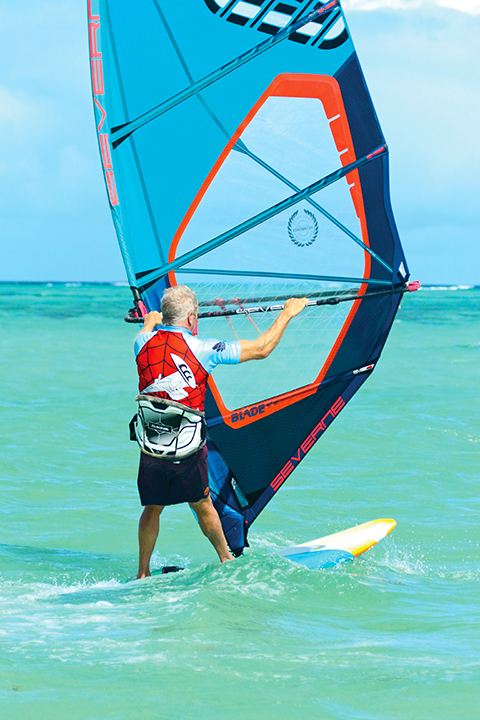
The challenge now lies in flipping the rig without losing it, made trickier by the fact that because you’re nearly stationary, it’s fully loaded and because you’re standing forward on the board very close to it. It can turn into a right old wrestle. If you just let go, it usually just piles into the water or swings behind you and knocks you off. Here are two points that will free you from jail with style.
1. Bear away. If you’re pointing upwind clew first, the leech is the leading edge and tugs like a bulldog on steroids. Off the wind the mast becomes the leading edge (as it is designed to be) and it all settles down. To bear away clew first when powered does demand a little muscle. Pull in the mast hand, extend the clew hand, and load the front foot to drive the nose away. As you bear away, drop the shoulders and hips back to create a bit of space.
2. Rig upright and forward. This is key. Having scooped the rig to turn, the mast may be behind you; so before releasing, move the rig upright and forward so the mast is between you and the front of the board. That way, when you release it, the rig rotates in front of you (and does NOT swing behind you).
FEEL THE FORCES
This is the most important tip – and yet the one that translates least readily into words. In all windsurfing we, the sailors, are the conduit through which the power flows into the board and drives or steers it. The stages of learning to plane are first committing to the harness. Once you feel that resistance, things are going to happen – the board will react … maybe not as you expected, but it’s a start. The next stage is where you start to feel exactly where you’re directing that force – to the point where a centimetre forward or back with the feet or hips suddenly makes a significant difference to board trim and its connection with the water.
Try and develop that same sensitivity when gybing and feel what it is that is turning the board.
In the pivot gybe the sensation is new, alien, even a little uncomfortable.
As you move the rig forward and to windward to catch the wind, the sail loads up and tries to pull you over your front foot; to resist that force and keep the rig to windward, you have to kink at the waist so the outside of your body forms a ‘C’ shape. You then feel that load go through that side of your body.
Then when you start to drop to the inside you feel the connection of your feet to the board – how you can scissor it around and use pressure through the back foot to drive the tail away. Basically the ‘feel’ approach is the antidote to gybing by numbers. And finally, try and get a sense of how board trim effects turning – moving your hips and or your feet fore and aft to lift or engage the edges.
COMMON PITFALLS
There are many ways of messing up a slam/pivot gybe – but the following are favourites.
It won’t turn!!
In light winds, a common sight is that of people drifting off downwind, scooping the rig like manic canoeists all to no avail. But if you let the board run straight downwind, the board speed cancels out the wind speed to leave you with an empty sail and no power to drive the nose round. The cure is to initiate the turn close to the wind where you have power, and keep it turning tight. In stronger winds, you start to turn – but then downwind it suddenly stops spinning. The board has levelled off prematurely. As you turn downwind, the rig powers up suddenly. Unless you counteract that force with extra back foot pressure, the nose will drop, the front edges will catch and you’ll stop turning. Likewise if you feel yourself being pulled onto the front foot, that’s the moment the board stops spinning. And are you far enough back? On long boards, you have to be back as far as you think is sensible, and then about another metre … especially if you’re light. The other cause is rig angle – keep the mast angled to the outside. If you let it come upright it just pushes the nose down rather than around.
Getting heaved over the front.
If your hips overtake your feet for a second, you’ve had it. The common mistake is breaking at the waist, rolling the shoulders forward and following the front hand into the water. As soon as you feel the pressure on the front arm, move the head, hips and everything in the opposite direction (i.e. back and in).
You stall and die on the tail.
It’s an all too familiar ending especially when you take your pivot gybe onto smaller boards. It stems from a misconception that to do a flare gybe you step back and pull the rig back with bent arms. You might get away with it on a long board that has volume in the tail to support both you and the rig. Although you drop the hips back, you initiate the turn by extending the front arm to push the rig forward and to windward to effectively catch the wind in the sail. If you bend the front arm, you’ll sheet out and can even get back-winded. The whole turn is performed with an extended front arm with front hand and the mast in front of you. That way you stay in touch with the mastfoot and can control the fore aft trim.
If you’re curiosity has been piqued by this article, check out Harty’s DVD, ‘10 steps to Gybing’, featuring Dave White and highlighting all of the above as well as the similarities and differences between pivot and carve gybes. Copies, and info. on Harty’s clinics etc., available through www.peter-hart.com